Monday, January 24, 2011

Operation: Fill-A-Frame #4

"Love You To Death"
Oh man... what to say about this piece, where do I start?

Chronologically sounds good...
I started with the frame. I bought it at least 2 years ago. I thought the coppery-metallic-orange would look great filled with some orange tropical flower. But after getting the frame home I found myself less than enthusiastic about filling it. A tropical flower didn't seem right for it... but I had no idea what did seem right. So there it sat. I felt a twinge of guilt every time I saw it, thinking I had wasted money on yet another frame I was never going to fill, another project I was never going to complete.

In 2009 my awesome husband took me to Reptiland in Pennsylvania for my birthday. The place was amazing! (I loved it so much we returned in 2010.) There were frogs, snakes, turtles, and a butterfly house! Since it was late in the year when we went, most of the foliage and flowers were gone and only a few lonely surviving butterflies remained. I took tons of pictures of them. It was cold; they weren't moving much; you could get so close to them.

Here are two of the pictures that I took and the two that inspired the piece of art:


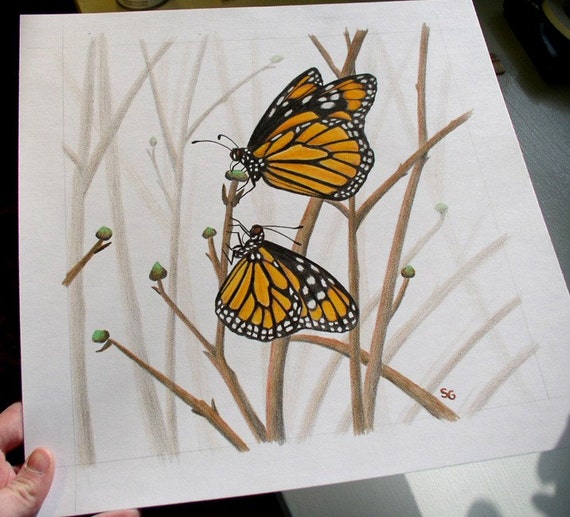
Fast forward to now and it's January and I'm working on this Fill-A-Frame project. I decided to take a break from the 8x10's and standard sizes I had around and get this square copper frame back out. I decided instead of a tropical flower, a monarch butterfly would look much better with the orange tones. I went through my Reptiland pictures again and loved the composition with the two butterflies (above) so much that I did a nasty (meaning, executed poorly but good and accurate enough for me to work from) rendition via Photoshop of what two monarchs would look like in the same position and began to work on the drawing.

Nasty Photoshop reference rough-draft
(I originally planned to extend the drawing onto the mat again, but I didn't have any white or light colored matboard around and eventually decided that I wanted only a small mat on this art, so unless I messed up the mat and HAD to color over it, I'd rather just have a plain mat.)

Here's the finished drawing:

I usually have trouble naming a drawing or painting, but most of the Fill-A-Frame project names are coming from songs or albums I'm listening to at the time that I create the art. It seemed quite fitting for this piece that the song I currently can't stop listening to is called "Love You To Death."


Why fitting?
I know, usually my art is super cheerful and happy, right? I definitely stepped out of my comfort zone a little for this one.

Here's why. The pictures that inspired the art were taken in a butterfly house... right before winter. Normally Monarch butterflies would migrate, but when importing live butterflies (chrysalis) from other states into a butterfly house, it's actually illegal to release those butterflies into the wild. When you visit a butterfly house, do you ever notice all of the signs asking you to check for "hitchhikers" before you leave? It's not just because they don't want to lose their butterflies... they don't want to break the law! When non-native species are released into a new environment, they can breed like crazy and mess up entire eco-systems... so there are strict laws against releasing those imported butterflies.

So even though the Monarch species was native to the area of the butterfly house, they still weren't allowed to be released into the wild. They, and the other remaining butterflies, had to just sit in the butterfly house and wait to die in the cold. I found it particularly sad with the Monarchs since they would've normally migrated south. They were imprisoned and just waiting for death.

Since there were a pair of them in this picture (well, in my made-up picture), it seemed at least a little more comforting that the two butterflies had each other and could wait for death together. Hence the "Love You To Death" title. (I know that's not what the actual song is about, but the title fit well.)

Next it was time to mat the drawing. Since I didn't need a huge mat, I went to a local art gallery to see if they had any matboard scraps around that they might otherwise be throwing away. Sometimes galleries will sell them to you cheap or in rare and especially nice cases just give them away! :) I got EXTREMELY lucky because not only did I find one of those NICE galleries, the lady working in the matting section even cut it to size (I did the inside cut) and the mat was this really cool tan color with some grayish-fibery-pieces in it. It was perfect; no way was I going to draw on it.

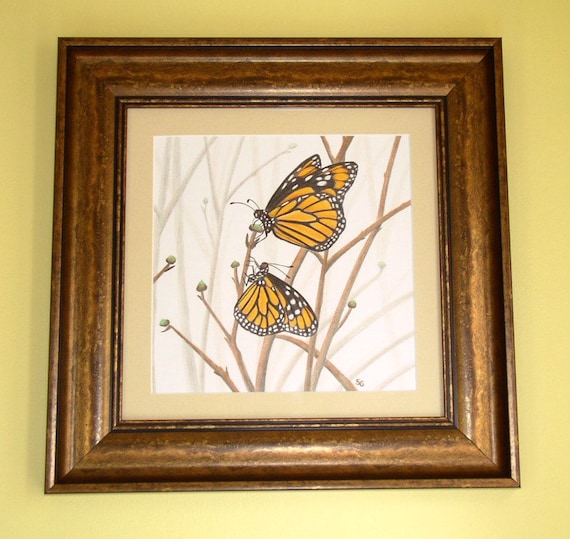
I put it all together, and there you have it. My first piece of sad artwork.


Sunday, January 23, 2011

Operation Fill-A-Frame #2 & #3

I filled up a couple more frames a while back and completely forgot to post about it!

Valentine's Bugs!
This artwork wasn't created specifically for Operation: Fill-A-Frame, it was actually created last year for an Etsy Team Challenge. However, like the frames, it was something I had laying around that I wanted to finish (i.e. frame it) eventually. So the two projects came together perfectly! I had the art... I had the frames... They just needed mats.


I was really torn between matting it in green or red. The dark green went well with both pieces and seemed practical because dark green is easy color to match to almost any decor in any home. But since the art was created for Valentine's day, it made sense to frame it in the obligatory red. People love buying things in red for Valentine's day... for what other reason does every store currently look like red, pink, and magenta came in and threw up all over their entryway!?

I decided to offer the option of either color mat.

They are both pastels with ink. Both pieces are currently $35 each, but check the listings as they may go on sale. I may offer a bundle discount if someone's interested in buying both!

Original "Bee Mine" framed artwork
If you're interested in buying this piece or seeing more photos, it's here in my Etsy gift shop:


Original "Love Bug" framed artwork
If you'd like to buy this piece or see more detailed photos, it's here in my Etsy gift shop:

This ladybird beetle one was a tough one- I had an idea for the composition but it took a lot of sketches to get it just right. Ladybugs love climbing around on the grass and the red and green colors look so nice together. The little beetle is pulling down blades of grass into the shape of a heart, and I made his little body slightly heart-shaped too :)


Wednesday, January 19, 2011

Please Vote :)

(Or as Puff Daddy (P. Diddy? Diddy?) would say, Vote or Die!)

I'm running a 24 hour poll on the Pollinator Plates blog regarding the design of the plate. Virginia has a lot of plates with a lot of blue in the background, but none (or at least very few) that are pimarily green. I posted two designs and want to choose the final one by tomorrow so I can send my legislator another letter with the new design.


If you have a moment, could you stop by the Pollinator Plates site and vote? The poll is in the upper right corner:
http://pollinatorplates.blogspot.com/

Thanks!! :)


Thursday, January 13, 2011

Oh no! I forgot my bread!!

I haven't posted about Tacos Y Burritos in a while, so like I recently did for my Tosh, here's a post for him since I have a silly story about him to share.

Tacos Y Burritos in Harrisburg!!

Today I was making a PBJ and used up the last 2 slices of bread. When this happens, we give Tacos the end (butt) of the bread as a treat. I'm not sure how "treaty" it is to him but we figure it has to be healthier than most other dogs treats out there (which, yes, he does get-- we are not totally mean!!) :)

I gave one of the ends to him but he wasn't very interested. I finished making my sandwich and thought he might like to go outside for a bit. So I asked him to speak (we're trying to teach him "speak" to be let outside... hoping that one day he'll figure out if he NEEDS to go out, when he speaks, we'll come open the door for him!), he did, I opened the door. He went out, immediately did a 180, and just stood there at the door looking back inside.

That's pretty odd since he's not like a cat who will waffle all day between in or out. He's pretty decisive about it!

I told him to come on back in and he did. I closed the door since it is cold outside today. But he seemed so excited to be outside, so I thought maybe he was just confused.
I asked him to sit, he did, I said "good boy" and patted him on the head.
I asked him to speak and he smacked his lips at me.
I asked him one more time, and this time he spoke- making one of his little whiney howly husky noises.
Once again, I opened the door- this time he whirled around and grabbed that sad looking bread butt and sprinted outside with it!!

Hahaha! So the first time he had forgotten the bread, realized it immediately, and wanted to come back in and get it. Then took it outside WITH A PURPOSE.

Dogs are so weird!

"Who you callin' weird!?!?"

.


Tuesday, January 4, 2011

Operation: Fill-A-Frame #1

Now available in my Etsy shop:
http://www.etsy.com/listing/65263488/oleander-moth-charisma-original-artwork

Number one is complete! A couple of nights ago I dreamed about moths- fuzzy, soft, friendly moths flying around and landing on people and instead of going "EW EW EW!" and swatting and flailing at the moths, everyone welcomed them, which made me happy. I always enjoy a friendly moth visit :)
Anyway, the dream was what inspired this piece. I've wanted to draw or paint an Oleander Hawk Moth with Oleander forever, so I finally did it.

I did 3 new and different things with this piece:

#1 I left the background white. I usually can't do that with colored pencils because the little flecks that accumulate as you press down HARD (like I do) stick to the paper and make tiny obnoxious specks. You can blow at them and hope they fly away, or sometimes take a pin or tip of an exacto and try to remove them like a surgical procedure. More often I end trying to so-gently brush them away with my hand... which results in a colored smear, hence why my backgrounds are always filled with color. At least with a painting I could just paint the whole background white when I'm done and cover up the mistakes! ...Now don't get me wrong, I had my share of little flecks that did find their way onto parts of the paper where I didn't want them! When that happened I added a flower bud or a leaf to cover it up :)

#2 I used a new set of eco-friendly colored pencils. I wrote a little about this yesterday in my review of the colored pencils (it was my first time using them and I loved them). I picked out the frame I was going to fill, then grabbed my box of colored pencils and picked out the paper I was going to use- a Strathmore drawing paper made from recycled paper. I realized at that point that if I used my eco-friendly colored pencils instead of my regular ones, this whole finished piece would be made from environmentally friendly materials and I thought that would be really cool. So I put back the box of colored pencils and, instead, took out the little package of 12 eco-friendly pencils.

This presented a challenge as well because I went from having a whole box of many colors from which to choose, to having only these 12. And of those 12, I used only 9:


#3 I let the drawing overflow onto the mat. I've always wanted to do a drawing and mat it and have parts of the drawing spill onto the mat for that sort-of 3D effect. I've seen it done so many times by other artists but never actually completed a drawing where I felt like putting some of it onto the mat would necessarily add anything to it. I decided that it would be fun to do with this piece.

Here are some pictures of the piece as it progressed:

Moth is done, starting on the flowers.

The drawing on paper is done. Time to mat it up!

The drawing extended onto the mat.

Framed & ready for its close-up :)


Monday, January 3, 2011

Forest Choice Colored Pencils... Awesomeness

Click to visit ForestChoice.com
A while ago a good friend of mine got me a set of Forest Choice colored pencils. Since I resolved (though not technically an official New Years Resolution- I don't believe in those- the timing happened to work out that way, thanks to the holiday and a very productive weekend) to get back to creating art (see yesterday's post about all these frames I have to fill!), I decided to finally put those pencils to use.

They seemed like the perfect choice for Operation: Fill-A-Frame: Eco-Friendly! All my frames were from a thrift store or rescued from being trash-bound, so the project is inherently environmentally friendly. Combine that with the Strathmore Premium Recycled Drawing paper on which I chose to do my first drawing for the project.... It all fit together. (I can't find the actual paper online, I think they changed their line up a bit since I bought mine, but here's one that looks close: http://www.strathmoreartist.com/product-reader/items/400-series-recycled-drawing.html)

I expected the pencils to be.... okay. What I didn't expect was that I would love them so much aside from the fact that they're made from environmentally responsible sources. They are really great pencils!

So what's so great about them?
  • Artistically I felt that they blended very well and the colors maintained themselves really well- meaning when I pressed hard on the yellow and then later accidentally went over it with a darker color, the yellow maintained its integrity there on the paper. The darker pencil did not trump the lighter color.
  • There are 12 in the set: Two blues, two greens, a yellow, a pink, red, orange, purple, brown, black, white.
  • Environmentally the wood in the pencils comes from well managed forests and is certified by the FSC.
  • The label is printed on recycled paper (not sure the content info) and the wrapper appears to be made from some recycled and unbleached paper but I cannot find that information anywhere on the packaging or online.
I love it when I find an environmentally friendly product that is just as good as its larger-carbon-footprint-bearing counterparts.... or better! I would say I enjoy using these just as much as my Prismacolors (actually more since I like the idea behind them) and am absolutely entertaining the idea of drawing with them exclusively for Operation: FIll-A-Frame. I still have a whole box full of Prismacolors and other assorted pencils and wouldn't just get rid of them or anything. But for this project these pencils seem perfect.

I rate these pencils EXCELLENT!


Sunday, January 2, 2011

Operation: Fill-A-Frame

After we moved and I unpacked all my art stuff, I decided to actually try and organize some things this time around! One of the first things I did was organize ALL of my empty frames, or frames that did have something in them but the frame got scratched or something.

Sooo many frames.

More frames!
Hm. I have a lot of frames.

A bunch of them were given to me by friends or family- one of my best friends goes to Salvation Army once in a while and if she sees a nice frame for a cheap price, she'll pick it up for me. Some of them I picked up if I saw a good sale going on, not realizing how many frames I already had!!

My goal in organizing the frames was, eventually, to fill them/fix them/paint them/all of the above. Whatever they need to get into good shape and be worthwhile. I also decided that while I could easily fill them with various prints, instead I'd fill them with ORIGINAL art. If the piece needs a colorful and unique mat, I'll use of some of the matboard I have sitting around and do a custom job for that piece. As I finish pieces, I plan to put them in my Etsy Shop since that's the easiest way for me to create unique listings for original one-of-a-kind pieces. If I do any art shows this year I'll probably bring the pieces there as well.
(I haven't signed up to do any art shows this year because #1 I was too busy with the move and #2 I'd like to do some of the local shows here but want to see where I'd fit in best before dropping $500 per show and picking shows at random.)

I'm hoping to start filling a frame today. I woke up feeling quite inspired since last night I dreamed about moths. Soft, friendly, fluffy, fluttery moths that were flying around and landing on people. Beautifully colored moths- luna moths, oleander moths, etc.I'm looking forward to finally getting out my colored pencils and using them again!!