I mentioned that I had a nice surprise at the Patriot News Artsfest show on Saturday morning. Here it is!!
My "Passionflowers" painting made the cover of The Patriot News' Go! section of May 27's paper (before the show).
You can click the image to see it full size.
A lady came up to my booth first thing Saturday morning and congratulated me... I had no clue what she meant. She pointed to the "Passionflowers" painting and said, "Your painting there was in the newspaper last week. On the cover!!" I laughed a little and said, "Oh... uh... no... I don't think that was me. They are using a picture of pottery to promote this year's show."
(Besides, why would they pick my random passionflowers picture to use on anything? Especially after my "Spring Lilies" had just been used in September to promote Kipona!)
No. Of course not!
She shrugged and said "Well....... maybe it was someone's photograph? But I'm pretty sure it was THAT picture. On the cover of Go!." I thanked her because it was still a compliment, and she left.
As the day went on, more and more people kept mentioning it... so of course my curiosity was getting the better of me. I hadn't looked at any papers all week since I was busy getting ready for the show. Finally one of my artist friends, Brownyn, showed up at my booth and confirmed that it was definitely, DEFINITELY my painting on the cover.
However, no one had a copy with them to show me, of course. It was driving me a little crazy that everyone had seen it but ME! Eventually a super, super, super nice friend of mine who I met at a show last year told me that her son would be at Artsfest the following day and she'd send her copy of it with him. And sure enough on Sunday he came in with it... lo and behold, there it was! (The pottery picture they used this year was inside, right on the official Artsfest Guide that people can take out of the Go! section and bring with them.)
I still found it pretty random that this bright colorful picture of a totally non-native plant was used to promote an art show all the way up here in PA... but I can't complain! :) I wonder who saw it and picked it?
I haz the warm fuzzies....
Showing posts with label Art show. Show all posts
Tuesday, June 29, 2010
Nice Surprise, from a month ago...
Sunday, June 13, 2010
Ned Smith Center Nature and Arts Festival!
I am very excited that I've been invited to exhibit (and sell, of course, hehe) my art at the Ned Smith Center for Nature and Art 17th Annual Nature and Arts Festival in Millersburg, PA! (Only about 40 minutes from Harrisburg!)
None other than the Mothman himself wandered into my booth at the Patriot News Artsfest a couple of weekends ago and overheard me talking to a friend about the caterpillar painting I'm currently working on. Naturally hearing "caterpillars" his ears perked up, and when he introduced himself as someone whose life has been amongst moths MY ears perked up.
I was so excited to ask him all about moths, and he was so excited to tell me all about the Nature and Arts festival. It's just a one day show on July 31st, but it sounded like a lot of fun and is very close to where I live.
Since we've started the house-hunting process, there is a chance that that weekend could be pretty busy or hectic, depending on when we find a house and when our move will take place. Since it's just one day, and hopefully my husband and I do a better job than last time of getting all our sh#t packed up on time, I could probably free myself up that day regardless.
I'm pretty excited about the show and have a swarm of ideas buzzing around in my head of some drawings (and paintings) I might like to try and get done in time for this show specifically... we'll see. I've spent a couple hours today on the caterpillar paintings and hope I'll be able to get the leaves all finished, and then I can start the milkweed flowers and finally finish up with the stars of the painting.... the caterpillars themselves!!
None other than the Mothman himself wandered into my booth at the Patriot News Artsfest a couple of weekends ago and overheard me talking to a friend about the caterpillar painting I'm currently working on. Naturally hearing "caterpillars" his ears perked up, and when he introduced himself as someone whose life has been amongst moths MY ears perked up.
I was so excited to ask him all about moths, and he was so excited to tell me all about the Nature and Arts festival. It's just a one day show on July 31st, but it sounded like a lot of fun and is very close to where I live.
Since we've started the house-hunting process, there is a chance that that weekend could be pretty busy or hectic, depending on when we find a house and when our move will take place. Since it's just one day, and hopefully my husband and I do a better job than last time of getting all our sh#t packed up on time, I could probably free myself up that day regardless.
I'm pretty excited about the show and have a swarm of ideas buzzing around in my head of some drawings (and paintings) I might like to try and get done in time for this show specifically... we'll see. I've spent a couple hours today on the caterpillar paintings and hope I'll be able to get the leaves all finished, and then I can start the milkweed flowers and finally finish up with the stars of the painting.... the caterpillars themselves!!
Tuesday, June 1, 2010
Patriot-News Artsfest review, sorta
Artsfest this weekend was a lot of fun and definitely a worthwhile show! It was really nice not to have to rent a car or hotel room for the weekend to do the show either, since it's about 10 blocks away. I also got some really cool news on Saturday morning, related to my art, but I have to scan in an image before I can post it.
This post is mainly a review of my experience at this year's Patriot News Artsfest here in Harrisburg. It's as much for other readers as for myself, since I'd like to write up my mental notes while they're still fresh in my mind.... I've already been saying the show went well enough that I'll apply to do this show again next year if I can find a friend to stay up here with (since by then I'll be living down in DC and admittedly still don't make enough at *most* shows to cover hotel expenses).
This show was in Riverfront Park, same as Kipona (but further north, I believe). It was much much better for me than Kipona in that I made up my show fees (jury fee, booth fee, bathroom pass WTF fee) the first day. The 2nd day wasn't as great and the 3rd day (Monday, Memorial day) was by far the worst. Which was funny because a lot of artists had been saying Monday was supposed to be the best day! I didn't have high expectations, thank goodness.
At this show it seemed like the patrons were mostly interested in the smaller inexpensive items. I didn't sell any of my 11"x14" matted to 16"x20" prints. I didn't really see anyone carrying around bags with BIG art in them until Monday, when they must've had a chance to see everything they wanted to see and make their final decisions on what to take home. New for this show I made little 5"x7" prints of my "30 Bugs in 30 Days" ACEOs with colored borders. People really seemed to like those, I sold a whole bunch! I also sold a lot of greeting cards (they are 5"x7" and as so they can be framed, they just aren't archival) and mousepads (they're made from recycled tire rubber). Things for me to keep in mind next year- I don't need to go crazy making inventory of my bigger prints.
There was a dinner for the artists on Sunday night which was super, super, super nice of them. I've only been to one other show that did that- Portsmouth's Seawall Show. At both shows my husband and I got to sit and eat with other artists, all of whom were extreeeeemely nice. Have I ever mentioned before that 99.999% of the artists at these shows are some of the nicest people you'll ever meet? I stand firmly behind that statement :)
This was also the first year they've charged admission to the show. (Hooray! I say.) I heard from many artists who had done the show before, and some volunteers, that attendance was way, waaaayyy down from other years- likely because of the new fee. However, I also heard multiple patrons walking by saying things like "If I had to pay to come in here, I HAVE to walk out with something to make up for it!" I'm not sure I get that logic... but as a vendor, I didn't mind that mentality. I'm not sure how many people think that way- if you pay a fee to get into an art show or something like that, would you be sure to bring home something to make sure it was worth your money to get in?
One weird thing about this show was the bathroom situation. On Saturday morning some folks pulling a wagon with beverages in it walked by yelling, "Orange juice? Water? Coffee? Bathroom passes?"
Of course since I can't just pop a squat and go to the bathroom in the corner of my tent, my ears perked up. I hadn't thought to look for bathrooms but I had seen port-a-potties a block or so away from my booth and just assumed those were for everyone. After asking a couple of the other artists and volunteers at the show, I was enlightened: The outhouses were available to us artists, but there were people who would 'man' them and keep them [relatively] clean and pump soap into your hands for you and give you paper towels at the handwashing station. And of course they do it for tips. Ok... fine, whatever. Also a church, a block away in the opposite direction of the outhouses, was selling bathroom passes for use of their bathrooms. They had two bathrooms, each one was private, it was [relatively] air-conditioned and clean and... well... private and clean. Bathroom passes from the church cost $10 (for the 3 day weekend) and the money went to the church. I'm not a church person at all but cleanliness + privacy > outhouse every single time, so I went for that option. Plus I figured after tipping the folks at the outhouses, I would've easily gone through $10 by the end of the weekend anyway. I have to say though, it was a little bit of a shock to not have bathrooms just provided to the artists as part of our booth fee, since we had to pay $300+ for a spot. I've never been to a show where bathrooms weren't provided for the artists. (Then again at other art shows, food isn't provided, water isn't provided, a place to sleep and shower isn't provided, so why should I assume bathrooms would be?) I'd almost rather pay an extra $10 or $20 for my booth that would go directly to whoever is providing bathrooms/keeping them clean, just to not have to worry about figuring out the bathroom situation when I'm there or making sure I have a dollar on me every time. Maybe I'll invest in a chamber pot and not have to worry about this again.
The other slight inconvenience of this show (that is completely unpreventable and no fault of the show, just something to keep in mind if you're an artist considering it) is that it's friggin DUSTY. I wasn't even on the side of the park where the grass/dirt is (but I did have the back of my tent open on the last day) and my stuff is still covered in dust. I remember things being really dusty after Kipona, but I was also right in the middle of dirt and dust where everyone was walking. This year I was on the street. I thought about dusting things off for the last hour of the show on Monday, before pack up time, but that wouldn't have done any good because the most dust is kicked up by the artists ourselves as we pack everything up- kicking heavy containers around, shaking out our tents and tent walls, fluffing out packing materials, etc. My car is still loaded full of my crap and I plan to dust everything off before putting it away in the garage! Not saying at all that this is anything bad about the show, just something in my mental notes that I need to make sure I remember for next year.
This post is mainly a review of my experience at this year's Patriot News Artsfest here in Harrisburg. It's as much for other readers as for myself, since I'd like to write up my mental notes while they're still fresh in my mind.... I've already been saying the show went well enough that I'll apply to do this show again next year if I can find a friend to stay up here with (since by then I'll be living down in DC and admittedly still don't make enough at *most* shows to cover hotel expenses).
This show was in Riverfront Park, same as Kipona (but further north, I believe). It was much much better for me than Kipona in that I made up my show fees (jury fee, booth fee, bathroom pass WTF fee) the first day. The 2nd day wasn't as great and the 3rd day (Monday, Memorial day) was by far the worst. Which was funny because a lot of artists had been saying Monday was supposed to be the best day! I didn't have high expectations, thank goodness.
At this show it seemed like the patrons were mostly interested in the smaller inexpensive items. I didn't sell any of my 11"x14" matted to 16"x20" prints. I didn't really see anyone carrying around bags with BIG art in them until Monday, when they must've had a chance to see everything they wanted to see and make their final decisions on what to take home. New for this show I made little 5"x7" prints of my "30 Bugs in 30 Days" ACEOs with colored borders. People really seemed to like those, I sold a whole bunch! I also sold a lot of greeting cards (they are 5"x7" and as so they can be framed, they just aren't archival) and mousepads (they're made from recycled tire rubber). Things for me to keep in mind next year- I don't need to go crazy making inventory of my bigger prints.
There was a dinner for the artists on Sunday night which was super, super, super nice of them. I've only been to one other show that did that- Portsmouth's Seawall Show. At both shows my husband and I got to sit and eat with other artists, all of whom were extreeeeemely nice. Have I ever mentioned before that 99.999% of the artists at these shows are some of the nicest people you'll ever meet? I stand firmly behind that statement :)
This was also the first year they've charged admission to the show. (Hooray! I say.) I heard from many artists who had done the show before, and some volunteers, that attendance was way, waaaayyy down from other years- likely because of the new fee. However, I also heard multiple patrons walking by saying things like "If I had to pay to come in here, I HAVE to walk out with something to make up for it!" I'm not sure I get that logic... but as a vendor, I didn't mind that mentality. I'm not sure how many people think that way- if you pay a fee to get into an art show or something like that, would you be sure to bring home something to make sure it was worth your money to get in?
One weird thing about this show was the bathroom situation. On Saturday morning some folks pulling a wagon with beverages in it walked by yelling, "Orange juice? Water? Coffee? Bathroom passes?"
Of course since I can't just pop a squat and go to the bathroom in the corner of my tent, my ears perked up. I hadn't thought to look for bathrooms but I had seen port-a-potties a block or so away from my booth and just assumed those were for everyone. After asking a couple of the other artists and volunteers at the show, I was enlightened: The outhouses were available to us artists, but there were people who would 'man' them and keep them [relatively] clean and pump soap into your hands for you and give you paper towels at the handwashing station. And of course they do it for tips. Ok... fine, whatever. Also a church, a block away in the opposite direction of the outhouses, was selling bathroom passes for use of their bathrooms. They had two bathrooms, each one was private, it was [relatively] air-conditioned and clean and... well... private and clean. Bathroom passes from the church cost $10 (for the 3 day weekend) and the money went to the church. I'm not a church person at all but cleanliness + privacy > outhouse every single time, so I went for that option. Plus I figured after tipping the folks at the outhouses, I would've easily gone through $10 by the end of the weekend anyway. I have to say though, it was a little bit of a shock to not have bathrooms just provided to the artists as part of our booth fee, since we had to pay $300+ for a spot. I've never been to a show where bathrooms weren't provided for the artists. (Then again at other art shows, food isn't provided, water isn't provided, a place to sleep and shower isn't provided, so why should I assume bathrooms would be?) I'd almost rather pay an extra $10 or $20 for my booth that would go directly to whoever is providing bathrooms/keeping them clean, just to not have to worry about figuring out the bathroom situation when I'm there or making sure I have a dollar on me every time. Maybe I'll invest in a chamber pot and not have to worry about this again.
The other slight inconvenience of this show (that is completely unpreventable and no fault of the show, just something to keep in mind if you're an artist considering it) is that it's friggin DUSTY. I wasn't even on the side of the park where the grass/dirt is (but I did have the back of my tent open on the last day) and my stuff is still covered in dust. I remember things being really dusty after Kipona, but I was also right in the middle of dirt and dust where everyone was walking. This year I was on the street. I thought about dusting things off for the last hour of the show on Monday, before pack up time, but that wouldn't have done any good because the most dust is kicked up by the artists ourselves as we pack everything up- kicking heavy containers around, shaking out our tents and tent walls, fluffing out packing materials, etc. My car is still loaded full of my crap and I plan to dust everything off before putting it away in the garage! Not saying at all that this is anything bad about the show, just something in my mental notes that I need to make sure I remember for next year.
Friday, May 28, 2010
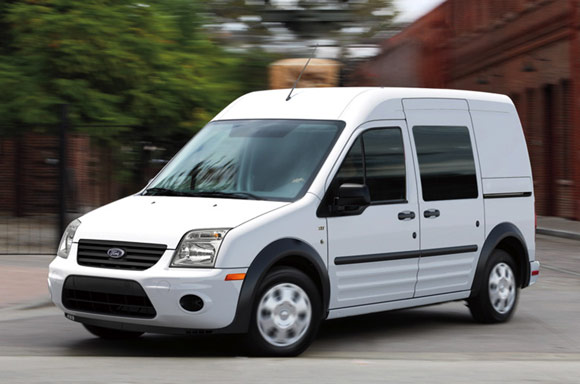
Ford Transit Connect: WANT
My first art show of 2010 hasn't even started yet... But the bitching and moaning about the difficulty of cramming as much stuff into my tiny RX8 as I can, versus the cost of renting something bigger for the weekend, started yesterday.

I keep seeing these on the road and
WANT,
WANT,
WAAAAAAANT!!!
You can read about it here:
http://www.theautochannel.com/news/2010/02/21/466585.html
I think it's the mostest adorablest solution to my problems! I've rented station wagons and SUVs before and they just DON'T fit everything. Or, if they do, I can't see out of the vehicle, so I wouldn't exactly call that a solution. Once I rented a Dodge Caravan. That van fit everything and it RULED. I really liked driving it, but it was sooo big and I just can't imagine driving something like that all of the time.
I thought a taller (versus longer, like a van) vehicle would be perfect and from what this article claims, the Ford Transit Connect is just for that. A small commercial-type vehicle with lots of room and minimal crap all over the place. Seriously it's like my DREAM ART SHOW MODE OF TRANSPORTATION.
Maybe some rental car companies will have these available soon...
Maybe I can rent one next time I have to transport my art stuff to a show far from home...
Maybe if I decide to ever take the plunge and try to do this for a living I'll cave and buy one.
But right now I don't sell enough art to justify the cost.... which would mean.....
Good bye RX8.

I'm just not ready for that.
"It's the car I've always wanted, and now I have it. I rule!"
a quote from my favorite scene in American Beauty... Check it out :)
So until the RX8 poops out on me completely, or some dillhole who fails to comprehend that the yield sign coming into downtown Harrisburg does, indeed, apply to him (or her) and finally hits me (cause it happens almost daily), the Transit must wait.
I keep seeing these on the road and
WANT,
WANT,
WAAAAAAANT!!!
You can read about it here:
http://www.theautochannel.com/news/2010/02/21/466585.html
I think it's the mostest adorablest solution to my problems! I've rented station wagons and SUVs before and they just DON'T fit everything. Or, if they do, I can't see out of the vehicle, so I wouldn't exactly call that a solution. Once I rented a Dodge Caravan. That van fit everything and it RULED. I really liked driving it, but it was sooo big and I just can't imagine driving something like that all of the time.
I thought a taller (versus longer, like a van) vehicle would be perfect and from what this article claims, the Ford Transit Connect is just for that. A small commercial-type vehicle with lots of room and minimal crap all over the place. Seriously it's like my DREAM ART SHOW MODE OF TRANSPORTATION.
Maybe some rental car companies will have these available soon...
Maybe I can rent one next time I have to transport my art stuff to a show far from home...
Maybe if I decide to ever take the plunge and try to do this for a living I'll cave and buy one.
But right now I don't sell enough art to justify the cost.... which would mean.....
Good bye RX8.
I'm just not ready for that.
"It's the car I've always wanted, and now I have it. I rule!"
a quote from my favorite scene in American Beauty... Check it out :)
So until the RX8 poops out on me completely, or some dillhole who fails to comprehend that the yield sign coming into downtown Harrisburg does, indeed, apply to him (or her) and finally hits me (cause it happens almost daily), the Transit must wait.
Tuesday, March 2, 2010
HELP HELP!!!! OMG IT'S TAX TIME.
I know for a lot of us this can be quite an overwhelming time of year. Especially if we are running our own little small business- selling arts, crafts, etc. I'm hoping this blog post might help some people out *a little* if you haven't done your taxes yet.
I know the first year I attempted to sell art at outdoor shows and galleries, I kept what I thought were very meticulous records: I kept track of all of my expenses, and all of my sales/income. And of course, saved all my receipts.
There. Done!
Uhhhh... no. Not even close. At tax time, I searched online to find out what I had to do to report any anythings about my business and found out I needed to fill out Form 1040 Schedule C. Great! I'll fill out that bad boy and away we go, smooooooth sailing from here! I downloaded the form and opened it up expecting to see this:
Imagine my shock and horror when I downloaded 2 pages of big words that I didn't understand, blanks, and instructions that ran you around in circles like, "Subtract line 7 from line 42 on page 2"... so you flip to page 2 to see "Add lines 28 and 29 and then subtract line 30 then multiply by the square root of the number of beers you had last night plus the calories you burned while the wheels in your head were spinning out of control as you try to comprehend this."
EEEEEEEEK!!!
Luckily after my first year of doing my own taxes (which took me like 12 hours), I now know to keep much better and more detailed records than "spent" and "earned."
I keep a spreadsheet every year of all my tax-write-off-expenses. I put my receipts into a little stack on my desk (and save all my emailed receipts from online purchases in a folder on my computer) and when they start to pile up, I open my spreadsheet and record them. I record the date, the store from which I made the purchase, the amount I spent, and then the category (the number of the line on the tax form) that I'll need to know when it's tax time.
Expenses on the tax form are broken down into allllll different kinds of things: Advertising, office supplies, legal fees, labor, inventory-type-stuff, and a crapload of others that I don't even use. I spent hours reading the instructions for Schedule C to understand what all the blanks meant (and I kind of feel like I still don't know...). Sorting between categories each and every time I record an expense has significantly cut down the time it takes me to do my taxes! Another thing I do at the end of the year is color code all the categories so I can easily just glance at the thing and know what's what.
In 2009 I also implemented something else to help me at tax time (and help over all with expenses). I made a chart of how much each thing I sell costs me to make. So, for example, if I'm selling a print- what goes into that? A plastic sleeve, backing board, paper, ink, sometimes a mat. I figure out the cost of each of those things and add them up, then I know how much it costs to make a matted 16x20 print, a matted 11x14 print, etc. (Ink is tough, I cheat; there are websites out there with that info, you just have to find them!) When I'm at an art show, each time I sell something, I write down what item I sold, the price of the item, and in parenthesis next to that I write in what that item costs me to make. This way at the end of each art show I know my real profits, not just what I sold. I can now also easily add up the "cost of goods sold" at the end of the year, and that minus what I spent on inventory = my inventory at the start of the following year.
It's a lot to contend with, maybe I could've/should've hired an accountant to do it all. We have one who does our taxes and each year he checks my forms to make sure at least everything makes sense! And so far it has.
One piece of advice that he gave me was, "Getting the expenses in exactly the right blanks isn't necessarily the most important thing. The most important thing is just that you report everything and get it on that form somehow."
Good luck this tax season, everyone!!
I know the first year I attempted to sell art at outdoor shows and galleries, I kept what I thought were very meticulous records: I kept track of all of my expenses, and all of my sales/income. And of course, saved all my receipts.
There. Done!
Uhhhh... no. Not even close. At tax time, I searched online to find out what I had to do to report any anythings about my business and found out I needed to fill out Form 1040 Schedule C. Great! I'll fill out that bad boy and away we go, smooooooth sailing from here! I downloaded the form and opened it up expecting to see this:
Income: $________
-Expenses: $________
=
Profit (what we're going to tax you on):$_______
Imagine my shock and horror when I downloaded 2 pages of big words that I didn't understand, blanks, and instructions that ran you around in circles like, "Subtract line 7 from line 42 on page 2"... so you flip to page 2 to see "Add lines 28 and 29 and then subtract line 30 then multiply by the square root of the number of beers you had last night plus the calories you burned while the wheels in your head were spinning out of control as you try to comprehend this."
EEEEEEEEK!!!
Luckily after my first year of doing my own taxes (which took me like 12 hours), I now know to keep much better and more detailed records than "spent" and "earned."
I keep a spreadsheet every year of all my tax-write-off-expenses. I put my receipts into a little stack on my desk (and save all my emailed receipts from online purchases in a folder on my computer) and when they start to pile up, I open my spreadsheet and record them. I record the date, the store from which I made the purchase, the amount I spent, and then the category (the number of the line on the tax form) that I'll need to know when it's tax time.
Expenses on the tax form are broken down into allllll different kinds of things: Advertising, office supplies, legal fees, labor, inventory-type-stuff, and a crapload of others that I don't even use. I spent hours reading the instructions for Schedule C to understand what all the blanks meant (and I kind of feel like I still don't know...). Sorting between categories each and every time I record an expense has significantly cut down the time it takes me to do my taxes! Another thing I do at the end of the year is color code all the categories so I can easily just glance at the thing and know what's what.
In 2009 I also implemented something else to help me at tax time (and help over all with expenses). I made a chart of how much each thing I sell costs me to make. So, for example, if I'm selling a print- what goes into that? A plastic sleeve, backing board, paper, ink, sometimes a mat. I figure out the cost of each of those things and add them up, then I know how much it costs to make a matted 16x20 print, a matted 11x14 print, etc. (Ink is tough, I cheat; there are websites out there with that info, you just have to find them!) When I'm at an art show, each time I sell something, I write down what item I sold, the price of the item, and in parenthesis next to that I write in what that item costs me to make. This way at the end of each art show I know my real profits, not just what I sold. I can now also easily add up the "cost of goods sold" at the end of the year, and that minus what I spent on inventory = my inventory at the start of the following year.
It's a lot to contend with, maybe I could've/should've hired an accountant to do it all. We have one who does our taxes and each year he checks my forms to make sure at least everything makes sense! And so far it has.
One piece of advice that he gave me was, "Getting the expenses in exactly the right blanks isn't necessarily the most important thing. The most important thing is just that you report everything and get it on that form somehow."
Good luck this tax season, everyone!!
Monday, January 25, 2010
Let the games begin!
I'll be seeing you Memorial Day weekend at the Patriot News' Artfest in Harrisburg!! :)
http://www.harrisburgarts.org/artsfest/about.htm
I'll be sure to bring my new Sunflowers painting, and hopefully get some new bug drawings done in time as well!
http://www.harrisburgarts.org/artsfest/about.htm
I'll be sure to bring my new Sunflowers painting, and hopefully get some new bug drawings done in time as well!
Thursday, January 21, 2010
Busy year, strange year...
Over the last couple of months I've learned that it's not exactly the norm to know that your existence in a certain location has a finite lifespan and you have no idea where you're going when it's over. I figured people did this all the time!My husband's job technically ends in July- but even that could be tentative. We've signed a lease on our apartment up until (or through?? I forget) September, in case we can't move at the exact time that his job here ends. In 2007, he started this PA job in July; I, however, did not relocate and join him up here until October because it took us that long to find (and get into) a place we liked. We're both kind of open to just about anywhere, so there isn't much of a limit to where we'll go.
I do have some places in mind that I think I would like, but am trying to remain open minded and not get my heart set on anything.
Aaaaaannnnd, once again, it's art-show-application time. I have NO idea if I should even apply to any shows. At first I figured I'd apply to the usual ones I try to do before July. Seems simple enough. Since after that we'll be moving, maybe I'd apply to one or two of the ones I like to do in the fall since hopefully by then we'll be settled and maybe even living near enough to MD or VA that I could still do the shows. But I certainly don't want to go spending $20-$40 on a bunch of applications to shows that, even if I got into them, I might not be able to participate in.
So I'm feeling pretty unmotivated on the art show front. This is usually the time of year that I start to get the urge to be creative and get some new art going (well, after I get my taxes done, bleurgh). And I go crazy thinking of new ways to arrange my booth! I go researching all over the internet, looking at everything from homes displaying artwork, to photosets on Flickr with booth ideas. I invested in a new print rack in the fall (local art shop closed and sold it to me for 10 bucks) and I'm just dying to see how it works- it can either be set on the ground or hung on the side of my tent... but anyway.
Since I've had some new ideas for art and want to play around with them, I'm wondering if I should do minimal shows this year and concentrate on working on new stuff, and possibly have a slightly different angle next year when I apply to shows. Should I step back from shows and visit some, as an observer and not a vendor, and build my inventory (especially if the economy is going to suck as much this year as last year)? Or should I go balls to the wall and give my work a big final push, especially locally, since relatively soon I'll be leaving PA behind?
Wednesday, December 16, 2009
More Art Show Advice....
I apologize for neglecting my blog so very much lately- this time of year there are always a million things going on, no?
Here is another bit of art show advice since soon it'll be time to start applying to shows again!
This piece of advice is simple and specifically written for set-up day.
And that advice is:
Put on a happy face.
Set-up day is just the worst. It's such a cluster. But one thing I've learned about art shows is that most artists' personalities from set-up day to show-weekend are night and day. On set up day you may be afraid of your neighbors. They may seem pissed or unfriendly and I know you will think, "Ugh!! I have to spend all weekend next to THIS person!?!? Set up day is bad enough and now my neighbors suck too!!" The truth is they're just as stressed as you are. I've had plenty of shows where I am so intimidated by my neighbors on set-up day, but once the actual show starts they always end up being some of the nicest people I've ever met! You're all there with a common goal, and from my experience, 99% of the other artists there are genuinely interested in helping each other out.
Pretty much every artist is in an awful mood on set-up day. (Um... at least I usually am!) The plus side of set-up day is getting to see familiar faces that you may not have seen since a show the year before. Even if you're like me and are usually running late, can't find a parking spot anywhere near your designated space, and are setting up all alone- seeing your art show friends will always cheer you up!
Every show's layout and set up procedure is different, so you and a hundred or more artists are scrambling to get your stuff to your spot in the most efficient way possible. It can be quite confusing and frustrating, especially if it's the first time you've done a particular show. After a year or two, you're somewhat familiar with the procedure and that does help immensely.
If it's your first time at a show (or your first time doing any show at all!), take a deep breath and try to relax. Then try to find someone who doesn't seem too busy and who looks like they wouldn't mind being interrupted (i.e. it's probably best to avoid the artists who look like they are about to have an aneurysm because an entire set of Pro-Panels is one fastener away from tumbleing down upon them, or are holding up their entire tent with one hand while extending the legs, or have just injured themselves with their tent weights and are uttering strings of obscenities). Just smile and ask someone who seems relaxed (and familiar with the territory) for some parking/set-up advice and they will probably be more than happy to help you out.
And, at every show, I promise you.... there will be that POMPOUS *#$&!# who thinks they are more important than everyone else and will take their gigantic truck with the uterus logo on it (not that everyone with those trucks is a pompous *#$&!#, just some) and their humongous trailer and just barge on through the already convoluted disarray of vehicles, tents, and artists to get right up to THEIR spot. If you're in their way, they'll even start demanding you move. Yeah I've seen it!! Once they've arrived at their spot, of course, they will park their chariot in the middle of traffic flow (because why park it anywhere else and inconvenience themselves?) and remove everything from their uterus-mobile, set everything up, and refuse to move said uterus-towing-giant-trailer until they are completely done for the day and ready to leave the show grounds. Nevermind that the show rules almost always indicate that you park your vehicle as close as you can to your spot, unload as fast as you can (throw your stuff into a pile in your spot), and then have the courtesy to move your vehicle the hell out of the way so others can do the same.
I suggest putting on a happy face on set-up day for your sake and others'. You're going to have a lot going on and you just want it done and over with. It's easy to huff and puff around and snap at everyone who so much as breathes in your general direction, but the fact of the matter is that you're spending the entire weekend with these people and the economy is in the toilet, so you better find a way to enjoy yourself. Otherwise you'll be miserable.
Try to be nice, because the person who may be annoying the #*&@ out of you on set up day may end up being one of the nicest people at the show once everything is up and running!!
Here is another bit of art show advice since soon it'll be time to start applying to shows again!
This piece of advice is simple and specifically written for set-up day.
And that advice is:
Put on a happy face.
Set-up day is just the worst. It's such a cluster. But one thing I've learned about art shows is that most artists' personalities from set-up day to show-weekend are night and day. On set up day you may be afraid of your neighbors. They may seem pissed or unfriendly and I know you will think, "Ugh!! I have to spend all weekend next to THIS person!?!? Set up day is bad enough and now my neighbors suck too!!" The truth is they're just as stressed as you are. I've had plenty of shows where I am so intimidated by my neighbors on set-up day, but once the actual show starts they always end up being some of the nicest people I've ever met! You're all there with a common goal, and from my experience, 99% of the other artists there are genuinely interested in helping each other out.
Pretty much every artist is in an awful mood on set-up day. (Um... at least I usually am!) The plus side of set-up day is getting to see familiar faces that you may not have seen since a show the year before. Even if you're like me and are usually running late, can't find a parking spot anywhere near your designated space, and are setting up all alone- seeing your art show friends will always cheer you up!
Every show's layout and set up procedure is different, so you and a hundred or more artists are scrambling to get your stuff to your spot in the most efficient way possible. It can be quite confusing and frustrating, especially if it's the first time you've done a particular show. After a year or two, you're somewhat familiar with the procedure and that does help immensely.
If it's your first time at a show (or your first time doing any show at all!), take a deep breath and try to relax. Then try to find someone who doesn't seem too busy and who looks like they wouldn't mind being interrupted (i.e. it's probably best to avoid the artists who look like they are about to have an aneurysm because an entire set of Pro-Panels is one fastener away from tumbleing down upon them, or are holding up their entire tent with one hand while extending the legs, or have just injured themselves with their tent weights and are uttering strings of obscenities). Just smile and ask someone who seems relaxed (and familiar with the territory) for some parking/set-up advice and they will probably be more than happy to help you out.
And, at every show, I promise you.... there will be that POMPOUS *#$&!# who thinks they are more important than everyone else and will take their gigantic truck with the uterus logo on it (not that everyone with those trucks is a pompous *#$&!#, just some) and their humongous trailer and just barge on through the already convoluted disarray of vehicles, tents, and artists to get right up to THEIR spot. If you're in their way, they'll even start demanding you move. Yeah I've seen it!! Once they've arrived at their spot, of course, they will park their chariot in the middle of traffic flow (because why park it anywhere else and inconvenience themselves?) and remove everything from their uterus-mobile, set everything up, and refuse to move said uterus-towing-giant-trailer until they are completely done for the day and ready to leave the show grounds. Nevermind that the show rules almost always indicate that you park your vehicle as close as you can to your spot, unload as fast as you can (throw your stuff into a pile in your spot), and then have the courtesy to move your vehicle the hell out of the way so others can do the same.I suggest putting on a happy face on set-up day for your sake and others'. You're going to have a lot going on and you just want it done and over with. It's easy to huff and puff around and snap at everyone who so much as breathes in your general direction, but the fact of the matter is that you're spending the entire weekend with these people and the economy is in the toilet, so you better find a way to enjoy yourself. Otherwise you'll be miserable.
Try to be nice, because the person who may be annoying the #*&@ out of you on set up day may end up being one of the nicest people at the show once everything is up and running!!
Sunday, November 22, 2009
Basics of How to Make Prints (Part 1)
Online or at various art shows, I'm surprised by the number of artists who ask me, "How do you make your prints?" Coming from a Graphic Design background in college, I've done it for so long now that I take it for granted!
Since it's such a common question, I thought I'd make a blog post (or, two) about it. Hopefully other artists out in the Wide World of Internets will somehow stumble upon this post and find it useful.
(This post is about making digital prints from a computer, as I'm definitely not educated in the other traditional methods of printmaking. I'm also assuming if you're going to a pro to have it done, they'll know what file type to save it as- and if you're doing it yourself, you're computer savvy enough to know about different file formats.)
*** If you've got questions after reading this, feel free to ask them in the comments section after this post or email me. ***
There are 2 main steps in creating a print from your original artwork:
#1. Obtaining the image capture as a digital file.
#2. Printing said file.
The methods of doing these two things and all of the in-between is where you really get into the nitty-gritty.
Since this will be a little long, I'll make it a two-parter. This, part one, will focus on the
IMAGE CAPTURE.
There are a number of ways to get an image of your art onto the computer.
If you're not computer savvy...
The easiest way for those who are not computer-savvy is to take your artwork to a business who specializes in this very thing. You'll have to check your local (or in some cases, not so local) listings to find a place. For example, the best place I've found is about an hour and a half away: "American Art Associates" in Annapolis, MD. Most printmakers will do an image capture for you: You bring in your art and they essentially put it on an easel and take a very high resolution photo of your image. Their lenses and equipment eliminate glares and shadows. They put the picture onto their computer, adjust the color if necessary, do whatever other magic they do (I've never been part of this process) and save it. From there you can have them make prints for you, or you can ask them to save it on a disk for you for later use.
Or try a little DIY.
If you are computer savvy and have some graphics software (Paint-Shop-Pro, PhotoShop, a myriad of others), you can try doing it yourself.
You can buy a scanner (they're pretty affordable, $100 and up) and scanning software (which should come with the scanner), lay your art on the scanner, scan it & import the image into the computer, and then save the file.
UPDATE: I've now created a post about how I scan in my paintings! It's here:
http://samanthasartstudio.blogspot.com/2010/07/how-to-scan-in-painting.html
Some artists have mentioned using a digital camera and taking a very high-resolution photo of their artwork themselves. You can try this if you've got a nice digital camera and, again, a little bit of graphics software. Be sure to *not* put your artwork in direct sun- it will be too bright and have much to much glare. Ideally, you want a bright but overcast day- or, if it's sunny, you want the art to be out of direct sunlight but in a bright place. No shadows.
Okay, so by this point you have your image saved as a file. Now what?... See Part 2 :)
Coming soon!
Since it's such a common question, I thought I'd make a blog post (or, two) about it. Hopefully other artists out in the Wide World of Internets will somehow stumble upon this post and find it useful.
(This post is about making digital prints from a computer, as I'm definitely not educated in the other traditional methods of printmaking. I'm also assuming if you're going to a pro to have it done, they'll know what file type to save it as- and if you're doing it yourself, you're computer savvy enough to know about different file formats.)
*** If you've got questions after reading this, feel free to ask them in the comments section after this post or email me. ***
There are 2 main steps in creating a print from your original artwork:
#1. Obtaining the image capture as a digital file.
#2. Printing said file.
The methods of doing these two things and all of the in-between is where you really get into the nitty-gritty.
Since this will be a little long, I'll make it a two-parter. This, part one, will focus on the
IMAGE CAPTURE.
There are a number of ways to get an image of your art onto the computer.
If you're not computer savvy...
The easiest way for those who are not computer-savvy is to take your artwork to a business who specializes in this very thing. You'll have to check your local (or in some cases, not so local) listings to find a place. For example, the best place I've found is about an hour and a half away: "American Art Associates" in Annapolis, MD. Most printmakers will do an image capture for you: You bring in your art and they essentially put it on an easel and take a very high resolution photo of your image. Their lenses and equipment eliminate glares and shadows. They put the picture onto their computer, adjust the color if necessary, do whatever other magic they do (I've never been part of this process) and save it. From there you can have them make prints for you, or you can ask them to save it on a disk for you for later use.
Pros of taking your art to a printmaking business for capturing the image and making prints:
1. These guys (and gals) do this for a living. This is what they get paid to do. If you're going to a reputable place, you can tell them what you want, sit back and relax, and they'll handle it AND make sure it looks great!
2. It's a lot easier than doing it yourself, aaannnnnd....
3. Much less time consuming than doing it yourself.
Cons of having a printmaker capture the image for you:
1. It can be expensive (depending on what your idea of expensive is...). An image capture of a large (over 11"x14") artwork, from my experience, can run $50 to $100 - maybe more. But since doing it yourself can be quite time consuming, having a professional capture an image of a large/difficult to photograph artwork is often well worth every penny.
Or try a little DIY.
If you are computer savvy and have some graphics software (Paint-Shop-Pro, PhotoShop, a myriad of others), you can try doing it yourself.
You can buy a scanner (they're pretty affordable, $100 and up) and scanning software (which should come with the scanner), lay your art on the scanner, scan it & import the image into the computer, and then save the file.
Pros of scanning it yourself:(I scan most of mine myself because I'm cheap like that, and since my favorite place is an hour and a half away, I have to do a bit of planning to allow myself time to drive over there. Plus gas money of course, blech. Again, I'm cheap.... When I can afford to be. Meaning that if I've got an painting that is huge, I'll gladly pay to have it done. I'll emphasize again that it is worth every penny.)
1. After purchasing a scanner, it's basically free.
2. No driving around or making appointments- do it at your leisure.
3. If the artwork is 8"x10" or smaller and not glossy, it's a fairly simple and straightforward process. Lay it on the scanner. Open your scanning software. Scan it in. Piece of cake. (You can even eat a piece of cake as your scanner imports the image.)
Cons of scanning it yourself:
1. It can take up a lot of time. So even though the process is free, is it worth your time to sit and fool around with it?
2. If you've used glossy paint.... forget it. If your paint has any gloss to it at all, the light from the scanner is going to reflect off that and make white highlights. No good. And no simple way (that I know of) to fix it.
3. Large pieces can be a huge pain in the ass and take a very long time. When I have finished a 16"x20" painting (which is not that big), it takes me at least 4 scans to scan it in. Most scanner beds are about 9"x 11". Even an 11"x14" artwork will take about 4 scans to piece everything together all nice and neat.
Oh, and that whole "piecing together" process? That can take HOURS. And you need good graphics software to do it, too. Sometimes the colors in each scan might vary slightly. Sometimes you get shadows along a gutter (where your painting overlaps the edge of the scanner bed). Sometimes you've laid your artwork down slightly off from a 90-degree angle, so you might have to do a little rotating to get it to fit. The larger your artwork, the more scans you have to do, the more opportunities for unwanted shadows, rotations, overlaps, etc. It ends up being almost like putting together a puzzle.
UPDATE: I've now created a post about how I scan in my paintings! It's here:
http://samanthasartstudio.blogspot.com/2010/07/how-to-scan-in-painting.html
Some artists have mentioned using a digital camera and taking a very high-resolution photo of their artwork themselves. You can try this if you've got a nice digital camera and, again, a little bit of graphics software. Be sure to *not* put your artwork in direct sun- it will be too bright and have much to much glare. Ideally, you want a bright but overcast day- or, if it's sunny, you want the art to be out of direct sunlight but in a bright place. No shadows.
Pros of using your own digital camera:I've tried the digital camera method- admittedly my camera is almost 10 years old. I took photos of some paintings but the largest I seemed to be able to print them and make them look good was only about 8"x10". I'm by no means an expert on this method and I'm sure digital cameras have come a long way in the last decade!! If you've already got a camera and some software, you might as well give this method a shot and play around with it, decide for yourself- it couldn't hurt.
1. None of that scanning/piecing together business if you've got a particularly large painting or drawing. Woo hoo!
2. If you're out of the sun, no worries about glossy paint or shadows.
3. Affordable... obviously. (Unless you go buy a very expensive new camera!)
Cons of using a digital camera:
1. If you've got a very large painting, you're going to need to take a photo at very VERY high resolution to make large prints from the painting.
2. Wobble? You might need to use a tripod to take the best photo possible.
Okay, so by this point you have your image saved as a file. Now what?... See Part 2 :)
Coming soon!
Thursday, October 29, 2009
Next Art Show...

On Sunday, November 8th, I'll be at Harrisburg Area Comminity College with members of the Jewelry Goddesses for a high-end art show and sale. I'll have some originals, some framed prints, and unframed prints too. I also hope to have some bug-boxes and other new items there, so come have a look! :)
Here's my newest bug box:
Hope to see you on Sunday the 8th!
Wednesday, September 23, 2009
Artsfest...
I had such a blast at Artsfest this year and was so excited that I was invited to show there again!
This year I was able to display on the pavement in the Tent Circle versus the Wooded Path. Don't get me wrong, I loved being in the woods, but wanted to try something different. Plus, both other shows I did this year were in the woods, so it was nice to be on some solid ground! :)
The best thing about being on the pavement was the spot that I was assigned: It was really really close to the entrance, which meant both of my grandfathers were able to come and see me. My grandfather who lives in Maryland takes walks every day, but I don't think he would have wanted to take the hike all the way back to my booth had it been in the woods. My grandparents from Virginia happened to be in town that weekend, too, so they also came by. My granddad had knee surgery a year or two ago, and still walks quite a bit, but I am not sure if he would have wanted to walk all the way back into the woods either.
It was neat getting to show them a little bit of what I'm doing now.
The weather during the weekend was PERFECT, and it was just a wonderful show to finish out my outdoor season.
This was also the first time I did a giveaway at a show, and congratulations to Kathleen who was the big winner! I'm still waiting to hear which print she picks.
Thursday, September 17, 2009
Giveaway at Artsfest!
This weekend is Artsfest at AnnMarie Garden in southern Maryland!
I'll be there on the concrete this time (I'm usually in the woods!) in the Tent Circle- spot # 60.
Also, for the first time at an art show I'm doing a giveaway! The prize is an 8"x10" print of your choice from my gallery of art at www.samanthasartstudio.com.
All you have to do is stop by my tent and sign up for my e-newsletter (frequency of said newsletter will vary from seasonal to monthly, at the most). Slips of paper will be provided where you can write your name and email address, then place them into a container. Container is still TBD, hehe. After the show, I'll pick a random name/email address from the container and contact the winner. Then you can let me know which print you would like and where you would like me to send it :)
I'm very excited about being able to offer this giveaway and hope that someone will receive a print that they will truly enjoy- or, if they are picking out a print as a gift, that the recipient will enjoy it as well!
If you click the image below, you can go to their site and print out a coupon for $1 off admission from Artsfest:

Hope to see you there! Weather is supposed to be great- sunny and lower 70's!
I'll be there on the concrete this time (I'm usually in the woods!) in the Tent Circle- spot # 60.
Also, for the first time at an art show I'm doing a giveaway! The prize is an 8"x10" print of your choice from my gallery of art at www.samanthasartstudio.com.
All you have to do is stop by my tent and sign up for my e-newsletter (frequency of said newsletter will vary from seasonal to monthly, at the most). Slips of paper will be provided where you can write your name and email address, then place them into a container. Container is still TBD, hehe. After the show, I'll pick a random name/email address from the container and contact the winner. Then you can let me know which print you would like and where you would like me to send it :)
I'm very excited about being able to offer this giveaway and hope that someone will receive a print that they will truly enjoy- or, if they are picking out a print as a gift, that the recipient will enjoy it as well!
If you click the image below, you can go to their site and print out a coupon for $1 off admission from Artsfest:

Hope to see you there! Weather is supposed to be great- sunny and lower 70's!
Tuesday, August 25, 2009
They choo-choo-choose...... me!?
Last month when I was in Maryland for my grandmother's funeral, I had one bright spot of good news during the week I was away. I received a voicemail from the Greater Harrisburg Arts Council telling me that one of my images I had sent in for jurying into the Kipona ArtFest had been selected for use in some advertising for the Kipona Festival. Print ads were mentioned, as well as billboards. I did get excited.... but tried not to get my hopes up for anything too spectacular (and, besides, I was a bit preoccupied with family matters). I assumed my image would be very small, maybe amongst 5 or more others, perhaps in a collage, used on a couple of things? A great honor to be chosen, obviously, and I looked forward to seeing my image somewhere in print in the near future.Imagine my shock when a few weeks later, my husband and I were returning home from a trip to Wyoming... and just as we drove into the city, he saw this:
Rolling tire? Pet? Small child? Caterpillar in the street?
"WHAT? What is it?! What's wrong??"
He said, "Isn't that your picture!?"
Oh no!!!! Even worse than a hazard! I was immediately assumed he meant a photograph of me, so I panicked. Impending doom.
"Oh no! What picture IS it? Why me? Why is MY picture on ANYthing?"
He answered, "It's there... It's your ARTwork."
Ohhhhhh yes. Yes it is. What. A. Relief. But it's *my* art on there, all alone- where are the others I assumed would be accompanying it? I mean, really? Just mine?
At that point though, I was really excited to see the billboard- but also assumed that other artists' work was being used on some advertising, too. After all, no one ever said anything about just using my image on things.
Later that week, we picked up the August MODE magazine. My husband was flipping through it on the couch. He mentioned there being an ad for Kipona in the magazine, and sure enough, there were my lilies again. I thought it was odd that both of the ads we'd seen so far were showing my flowers- I just figured other artists' work was being used on some of the advertising somewhere, too. Just hadn't seen it yet.
The following weekend, I got an envelope from Kipona in the mail, with a gigantic promotional postcard in it. (Artists participating in the festival can pre-order their postcards or wait until they see a sample, and then decide how many they want.) This particular sample had... again, my lilies on it.
I remarked, "Ohhhh, how nice of them to customize promotional postcards for each of the artists!!"
My husband gave me a funny look and replied, "I think EVERYONE has that postcard."
"Noooo... why would everyone have postcards with MY art on it? That doesn't make any sense."
"Sure it does. They used your art on the other stuff. They put it on the postcards for the show, too. It makes sense. The card you have is the same one as everyone else."
I just stared at it for a few minutes... then burst into laughter. Seriously?? All 149 (or however many) other artists have MY work on their postcards? Ridiculous. Hilarious. So they will be sending these out, and tons of people will see it? My painting? Really??? You've got to be kidding! I'm not even sure why I found (or still find) it funny... it was such a strange feeling.
The following weekend was the Mt. Gretna art show, and the postcards made their first public appearance. I guess the other artists who had pre-ordered had brought them and were handing them out. Most people were using the cards as fans since it was pretty hot, but it was still funny to me to see them everywhere.
When The Patriot called me yesterday to ask me a few questions about me, my art, Kipona, etc. (I can't believe I've been in their paper twice this year!) I did learn that Kipona does, in fact, pick one image and this artist is their "Featured Artist" for the show. Apparently... that's me. I am still shocked, and beyond flattered that, of all the images the judges must've seen, they liked mine enough to even consider it- let alone select it. I was already very excited about the show since it's in such close proximity to where I live, it's on the water, beautiful time of year- what could be better? Now I'm counting down the days until I can go set up my tent- I'm SO excited!
Even more about this show:
http://www.festivalsinpa.com/kipona-festival/
As if the show didn't have enough other cool things going on, there is also a Chili Cookoff and I believe I also read something about a Margarita Tasting! Guess unlike most other art shows, this one will have some refreshments to write home about.
Monday, August 3, 2009
Featured Artist: First Friday, August 7th, Gallerie 13
I can't believe I hadn't posted about this yet, but I didn't want to post about it TOO early... now time has flown by and I realized my big show is less than a week away.
At Gallerie 13 in Mechanicsburg, I'm one of two featured artists for the month of August. Brownyn Jean Hughes (whose work is absolutely fantastic) invited me to show with her this month and needless to say, I was flattered. It all happened pretty quickly, but I had just enough time to prepare, and enough work to fill up a wall.... so here I am!
I spent all last week framing and making prints. Sunday I spent the day hanging up my work at the gallery. I've still got 1 or 2 more things I might frame and put up, but not quite sure yet.
Anyway, here's a sneak preview:


There is more information here:
http://www.gallerie13.com/Events.html
and if you're in the Harrisburg/Mechanicsburg area on Friday, stop by in the evening to check out the show!
At Gallerie 13 in Mechanicsburg, I'm one of two featured artists for the month of August. Brownyn Jean Hughes (whose work is absolutely fantastic) invited me to show with her this month and needless to say, I was flattered. It all happened pretty quickly, but I had just enough time to prepare, and enough work to fill up a wall.... so here I am!
I spent all last week framing and making prints. Sunday I spent the day hanging up my work at the gallery. I've still got 1 or 2 more things I might frame and put up, but not quite sure yet.
Anyway, here's a sneak preview:
There is more information here:
http://www.gallerie13.com/Events.html
and if you're in the Harrisburg/Mechanicsburg area on Friday, stop by in the evening to check out the show!
Wednesday, May 27, 2009
Outdoor Art Show Advice, part 2- Display Walls & Panels
This blog post started life as a Squidoo Lens, which you can find here:
http://www.squidoo.com/OutdoorArtShowInfo
I wanted to take the information from that page and elaborate on it a bit.
My blog is mostly geared toward 2-dimensional artwork, therefore this post is mainly weighing different options for walls and panels on which artists can hang their artwork.
However, this Flickr pool has lots and lots and LOTS of ideas for displays, booths, tables, indoor and outdoor, for anyone who wants to do craft shows! You may want to bookmark this and refer back to it from time to time.
http://www.flickr.com/groups/craft_fairs/pool/
Now that you're overwhelmed with display ideas...!!
My advice for finding a tent (if you decide to purchase one) applies to panels, too:
Look for used!
Save money and be eco-friendly! Or if you can't find used, start with a few new panels, and keep your eye open for good deals on used ones and snag them as you find them.
There are so many manufacturers of panels out there. You can set up your booth in so many different ways, too! Walls on 3 sides, walls and miscellaneous walls that stick out and about, making your booth a little like a maze (but in a good way), or just a wall in the back. If you can, you may want to go visit an outdoor art show and take a look at different booths. Decide what you like, what you don't like, or if you notice a trend (such as, most artists tend to leave a space open in the back where they can put their chair and desk and sit, out of the way, but still be accessible to customers), take note of it, and factor that into your layout.
I'll price these out by panel, and give you a few more pricing options for walls and booth as well. For these below, cost and wall size is figured for a standard 10'x10' booth.
Pro-Panels
Carpeted, lightweight, heavy duty VERY nice looking panels.
I've talked to artists who have been using these for over 10 years. They are highly recommended (and my panels of choice). However I couldn't afford them for my first show, so at that time, I made my own (scroll down and you'll see!). But these are definitely worth the investment. There are also a lot of different size options and colors available, too. They offer panels that break into two pieces and fit into most sedans- NICE! The cheapest options for a wall would be to get 3 of the 38.5" wide panels (6 or 7 feet tall, do not break apart), at $115 apiece, $345 for a wall, $1,035 for 3 complete walls (doesn't include shipping).
http://www.squidoo.com/OutdoorArtShowInfo
I wanted to take the information from that page and elaborate on it a bit.
My blog is mostly geared toward 2-dimensional artwork, therefore this post is mainly weighing different options for walls and panels on which artists can hang their artwork.
However, this Flickr pool has lots and lots and LOTS of ideas for displays, booths, tables, indoor and outdoor, for anyone who wants to do craft shows! You may want to bookmark this and refer back to it from time to time.
http://www.flickr.com/groups/craft_fairs/pool/
Now that you're overwhelmed with display ideas...!!
My advice for finding a tent (if you decide to purchase one) applies to panels, too:
Look for used!
Save money and be eco-friendly! Or if you can't find used, start with a few new panels, and keep your eye open for good deals on used ones and snag them as you find them.
- Craigslist
- Pro-Panels Trading Post
- Pro-panels are sort of what I refer to as the "Rolls Royce of Art Show Display Panels." In my opinion they're the best of the best! They're expensive though, but the company is very helpful in putting up a forum on their own website where people can look for used panels to buy, or sometimes rent.
- The Wet Canvas Swap Shop
- This is a forum from the WetCanvas art website. There are mostly art supplies in this forum, but you may be able to find display equipment too.
- Ebay
- Check Ebay for good deals on both new and used craft show supplies.
There are so many manufacturers of panels out there. You can set up your booth in so many different ways, too! Walls on 3 sides, walls and miscellaneous walls that stick out and about, making your booth a little like a maze (but in a good way), or just a wall in the back. If you can, you may want to go visit an outdoor art show and take a look at different booths. Decide what you like, what you don't like, or if you notice a trend (such as, most artists tend to leave a space open in the back where they can put their chair and desk and sit, out of the way, but still be accessible to customers), take note of it, and factor that into your layout.
I'll price these out by panel, and give you a few more pricing options for walls and booth as well. For these below, cost and wall size is figured for a standard 10'x10' booth.
Pro-Panels
Carpeted, lightweight, heavy duty VERY nice looking panels.
I've talked to artists who have been using these for over 10 years. They are highly recommended (and my panels of choice). However I couldn't afford them for my first show, so at that time, I made my own (scroll down and you'll see!). But these are definitely worth the investment. There are also a lot of different size options and colors available, too. They offer panels that break into two pieces and fit into most sedans- NICE! The cheapest options for a wall would be to get 3 of the 38.5" wide panels (6 or 7 feet tall, do not break apart), at $115 apiece, $345 for a wall, $1,035 for 3 complete walls (doesn't include shipping).
-
- My current booth, with Black ProPanels. I use shutters (found at any hardware store) to display greeting cards.
- Armstrong Panels
Carpeted, lightweight, heavy duty VERY nice looking panels.
Different break-down options, again for smaller vehicles. Also come in lots of different colors. For "The Gallery" panels, 38"wide x 7' tall, the cost is $125 apiece. You need 3 to complete one wall, so the cost for a single wall would be $375. For 3 full walls of a 10'x10' booth, $1,125 (doesn't include shipping cost). - Graphic Display Systems
Metal mesh panels that you can use as-is, or purchase fabric covers for them. The metal mesh is also really good in the wind, as it does let the wind pass through it.
Fabrics are offered in different colors or if you're crafty, you can make your own covers! I have talked to artists who have used these for over 10 years as well, and the panels still appeared to be in very, very good shape. These are also offered in break down options for smaller vehicles. For their Standard (non-break-down) 37.5" x 6' panel, each costs $75. Again, 3 are needed to complete 1 wall, so $225 for one wall, and $675 for 3 walls of a 10'x10' booth. Not sure on the cost of shipping for these.
I've seen a lot of different options for covering these, including burlap or bamboo mats for a natural look. Your options are almost limitless! Go crazy with creativity!
Here is the site for the covers you can order:
http://www.flourish.com/graphic_display_covers.html
- Lowes or Home Depot or your local hardware store.
Miscellaneous PVC pipe and garden wire. You would want to cover this with fabric, trust me. You can try and design your panels to the same sizes as the Graphics Display Panels and order covers from - http://www.flourish.com/graphic_display_covers.html
(or order a cover first, and see if you can create a panel to fit in it.)
When I did my first show, I used PVC pipe costing about $12 for all of it, duct tape costing maybe $8 , and garden wire at about $30 for the roll I needed (and I still had a lot left over). I spent maybe another $12 on fabric to cover it- pretty cheap.
Supplies for panels all laid out...
- First frame constructed. I constructed my own break-apart panels so I could fit them into my car. I would give you more info such as measurements, etc. but I made an error when I made these, and instead of a 10-foot long wall, I ended up with a wall more like 11 feet. This wasn't a bad thing, as I ended up angling the panels to compensate for the extra space.
- These panels were made with PVC pipe frames and garden wire duct taped to the frame,
then covered in fabric.
I angled the panels so that people coming from either direction could see as much of my work as possible, since I didn't have enough panels to cover 3 of the sides. - Lowes also offers white plastic lattice or pegboard, which are other popular options at shows!
Monday, May 18, 2009
Outdoor Art Show Advice, part 1- Tent / Canopy
Booth set-ups, canopies, panels, banners, signage, print bins, tables.... it's getting to be that time of year again, isn't it?
For a lot of artists, the end of Spring/beginning of Summer marks the start of Outdoor Art Festival season!
There are so many helpful tidbits of information and advice that I learned through experience (good and bad!) or talking to artists at shows. I want to share them with anyone who's thinking about doing outdoor shows, and those of you who've already applied gotten into some shows this summer.... and you're excited but nervous, wondering what the hell you've gotten yourself into!! (And from other artists I've talked to, that was always the initial feeling!)
For the next couple of weeks on my blog (alongside my 30 Bugs in 30 Days series!) I'll address some of the biggest questions I see over and over again in Etsy forums and WetCanvas forums (and coincidentally, the very same questions I had before my first big show).
I've also created a Squidoo page (I guess they call it a 'lens' there) that isn't as in-depth as these articles will be, but I'm sharing some links to tents, panels, supplies, and other goodies!
http://www.squidoo.com/OutdoorArtShowInfo
If you've got a specific question, please leave a comment on my blog, or ask me! :) I'll be happy to help or at least point you in (hopefully) the right direction.
Today's post starts at the very beginning (a very good place to start, as Fräulein Maria will tell you) the first thing you'll need for outdoor art shows...
Your canopy/tent.
(I use the term tent, because a tent implies that it has walls and if you're investing in a tent for more than one show, you had better plan on having walls!) The standard size is 10' x 10'. I'd strongly suggest a white tent because many shows actually require white tents. A colored tent can be dark inside and cast a colored tint onto your artwork. You can add color in other ways, but we'll get to that in another post.
My first and foremost piece of advice (no matter WHICH tent you choose, this applies) and I can't emphasize it enough so I'll make it really, really big so you don't miss it:
LOOK FOR USED!!
You will save yourself a lot of money
(and, yes, it's also ecofriendly to buy used)!
There are a zillion tents out there, which one is the best? Like most things, it depends on who you ask.
A lot of people will tell you if you're just starting out, to go with a standard pop-up-style tent (AKA "EZ-up," which is actually a brand name and has become sort of like "Kleenex," used universally for all pop-up tents) for your first tent.


Left: Pop-Up (EZups, etc.), Right: Dome Style (TrimLine, Craft Hut, Light Dome, etc.)
Pop-Up Style Pros:
* Not huge & easy to transport: Doesn't take up too much precious cargo space (you WILL be surprised how quickly you can fill a vehicle!).
* Light weight (relatively speaking): can be carried a short distance without too much of a hassle
* Easy to set up: You can set it up by yourself in about 10 minutes. Even little teeny tiny personnel like myself can handle it.
* Cheap: These start around $100 (shop around) if you find a great sale and don't have to pay shipping (and will be even cheaper if you find a used one).
Sounds good! Why isn't everyone using these!? Because of the
Pop-Up Style Cons:
* Not made to last forever: It might need to be replaced in a couple of years. I've talked to some artists who have used these tents for many years but it turns out they've been pretty lucky and had amazing weather at each and every show.
* Light weight: These can easily become a giant, dangerous, almost-guaranteed-to-get-someone-sued flying and flailing metal octopus if not weighted/tied down properly on a windy/stormy day. Almost every experienced artist who does outdoor shows has a story about "that one show where a storm came through and this guy's tent went flying and landed up in a tree after blowing across the entire festival and wiping out people and expensive sculptures in its path of destruction". I've used a pop-up on a windy day, but you have to REALLY weigh it down (see further down in this post).
* Limited weather proofing: Some pop-ups are coated with waterproofing, but I've been told that after one or two good rains that waterproofing is gone. There are ways to help make them more waterproof, but these aren't guaranteed- they just help. The water can also tend to pool up in the corners of the tent roof if the roof sags which may cause your tent to collapse. I've seen this at a show and it's absolutely awful, because not only will your art be ruined, but possibly the art of the artist(s) next to you.... which adds insult (and $$$ expense) to injury.
* Some might consider these too heavy. They're 50 lbs easily (some go up to 60 or 70 lbs) and are all one piece, so there is no disassembly to make them lighter. Weight is good, but if you've got to carry it for a while or you have a bad back, it's not fun.
The more experienced artists who have decided to make a long term investment in their tent tend to go with a dome-style heavy and very waterproof canvas tent. There are lots of manufacturers you'll hear over and over (click these for their price & website): Craft-Hut, LightDome & Finale, TrimLine, ShowOff. So which of these is the best? Everyone who has one will probably tell you that theirs is the best. Artists decide on which one to get based on different things- weight, price, customization, expansion opportunity, etc. Each dome-tent artist with whom I've spoken has told me they're absolutely waterproof, and if that's your main concern, you'd be safe with any of these... But do your research.
Dome Style Tent Pros:
* Waterproof. Most will come with a patching kit if you get a rip, or a simple duct tape repair will do in an emergency.
* Heavy: You'll still have to weigh it down, but it's sturdy and won't appear to be doing a spontaneous rendition of The Elaine dance on a windy day.
* Sound and sturdy design: The roof is shaped in a way that rain (or SNOW) won't collect on the top, and the legs of these are made from very, very heavy aluminum or steel (depending on the model you choose) and won't collapse under the weight if anything did start to pool up on top.
* Comes apart into many pieces: If the one-piece EZ-up is a little heavy for you to lug around, you can break this down into light pieces to carry. You'll make 5 trips carrying light loads, rather than one trip with a heavier load.
* These are so sturdy, a lot of artists see it as insurance for their work. You're almost guaranteed to have no worries of collapse or weather problems if you've got one of these.
Dome Style Tent Cons:
* NOT cheap! This is probably the main reason why every artist isn't using one of these. But, you get what you pay for. Some full-time outdoor show (a show every weekend almost all year) artists have been using these in rain, wind, and snow for over 10 years!
* Comes apart into many pieces: Takes about 30 minutes to assemble, after you've gotten the hang of it. Your first few times might take close to an hour- which is fine if you're not in a hurry. This is the other aversion artists have to these tents, as the set up seems too complicated. The first set up can be confusing, but after that you'll be fine.
* Bigger pieces & more of them + thicker tent walls = takes up more real estate in transport.
Here are some great posts with information about different tents and things to consider- these should help in your decision making process!
http://www.wetcanvas.com/forums/showthread.php?t=352267
http://www.potters.org/subject73367.htm/
Weighting Your Tent....
No matter which style of tent you choose, the most important thing you need to do to your tent: Weigh it down! (Most tents come with stakes, but I've never used them- I don't trust them.) There are many different ways to do this, and at least 50 lbs per tent leg is recommended if there is any chance of wind or storms! This is also something I can't emphasize enough- you can't have too much weight holding your tent down and better safe than sorry. If having to manage 50 lbs by yourself sounds daunting, you can use multiple weights to add up to the 50 lbs...
- Freeweights. These are what I use. My pop-up has feet on the bottom of the legs, and my freeweights (weight plates) are the kind designed for use with a bar. I insert the foot through the hole and then rest the weight on the foot and tie the tent to the weight. On a nice day, I just use 25 lbs on each leg. If the weather is questionable, I use more. You can also use dumbbells, many times I've seen tent legs tied to 25 lb dumbbells (for 50 lbs, cross the dumbbells over one another and tie the whole works together and then tie to the tent).
- 5 gallon buckets. You can fill these with sand and set them beside your tent legs and tie the tent to the bucket, or actually set the tent leg in the bucket (and tie the tent to the bucket). If you're doing a show on the beach, this is really convenient- you can grab sand right there and dump it out easily at the end of the show. When I participated at a very windy show at the beach, I put a 25 lb weight into a 5 gallon bucket, put the leg of my tent into the bucket, tied the tent leg to the weight, then piled sand into the bucket on top of the weight. It also rained, which added more weight to the bucket. It was very sturdy! You probably don't have to buy buckets- if you know anyone who has a pool, chances are they've got some of these buckets around from chlorine. If not, post an ad on your local community website, freecycle.org, craigslist.org, or ask friends and family. Keep an eye on these though, because at crowded shows I've seen them used as an ashtray- which is not only kind of gross, but actually presents a fire hazard if a cigarette isn't completely out.
- Cement & PVC pipe. I have seen these at shows too, and these probably look the nicest of the different weights. I have no experience with them myself, but I see them all the time, so they must be reliable. You can make these yourself. If making single 40-50 lb weights for each leg is too heavy, make two smaller 25 lb weights for each leg.
Here is a GREAT blog with step-by-step instructions!
http://ronfrazier.blogspot.com/2006/06/pvc-and-cement-corner-weights.html
And another- Check out her booth, these weights are hardly even noticable:
http://artsycrafter.blogspot.com/2008/12/make-your-own-weights.html
Another great website with weight advice:
http://www.southendopenmarket.com/tips1.htm
If you just can't get enough of the tent weight info:
http://forums.gardenweb.com/forums/load/market/msg061846005122.html
http://www.artfairinsiders.com/forum/topics/weights-1
Weather-Proofing Pop-Ups....
If you decide to use a pop-up tent, there are definitely ways to make it last a long time and survive in storms.
Again, weight is important. These really DO fly away if not weighed down!
You'll also need:
Hula-Hoops or Swimming-Noodles. I'm not kidding! These are essential to prevent water from pooling in the corners of the tent roof. The corners of the pop-ups tend to sag, and when it rains, water will collect up there. During a show, sometimes people use a stick, broom, or their fist to poke the corners up and empty the water- but please make sure if you do this, it isn't going to splash onto customers or your artist neighbors' tents! If you have hula-hoops or swimming noodles, you can wedge them between the metal tent structure and the roof to create tension in the canopy material so the water will fall off and prevent the problem. (If you're unsure, someone at the show can probably show you how.) Look for these at a thrift store or the dollar store. You might be able to find some for free on freecycle or craigslist- post an ad and see what happens.
Our friend, The Artsy Crafter has a post about this and even a helpful photo! Check it out!
http://artsycrafter.blogspot.com/2009/05/hula-hoop-solution.html
Plastic Drop-cloths and Clamps. The pop-ups aren't the most waterproof, so this will definitely help when you've got a really rainy weekend. To completely cover the top of your tent, you'll need a drop cloth larger than 10' x 10' so that plenty of plastic hangs down over the sides of the canopy and directs the rain down and away from your art. If you need to, buy several clear plastic drop cloths and attach them together (before the show!!) with clear packing tape. As you're putting up your tent, you can throw this over the roof and as your tent goes up, your drop cloth will already be in place. You can pull the sides and center it after your tent is in position. Clamp the drop cloth down along the tent structure. I know this sounds like it will look terrible, but surprisingly it's actually not that noticable. I had to do this at the Neptune show last year, and I was afraid it was going to look dreadful and make my tent stick out like a sore thumb- but my tent easily blended in with everyone else's, and when it comes to rain possibly destroying your entire inventory, you gotta do what you gotta do!!
You can also take plastic drop cloths and hang them along the sides of your tent with the clamps. Just be sure that your roof plastic hangs OVER these and not under, or it will direct the rain flow right into your booth.

So while weather proofing a pop-up isn't easy or even guaranteed, it can be done. Mine has lasted me longer than most artists I talked to who had them, because I've taken a lot of precautions with it.
Waterproofing Spray:
SpareGus on Etsy recommends this as another good way to waterproof your tent: Spray the whole thing down with the waterproofing spray used on hiking boots and outdoor gear.
She says, "Basically, you would use it like you would on your gear - set it up, spray it liberally, and let it dry...make sure you've got nice weather when you do this, drying takes at least 24 hours. Most cans tell you to apply another coat after a couple days, but we have noticed that you really don't need to do that until after it's been rained on a bit...especially since doing a whole ez up, with sides, can take nearly a full can. Worth it, though, to keep everything dry. :)
Glad I could help!"
Other Resources....
Where to look for used tents:
Do a search in your area and if you live within a couple hours of other cities, do a search in those areas as well. It's worth it (to me) to drive a couple hours and save a few hundred bucks!!
Try searching for these terms & combinations of them:
"Canopy, Art Show, Display, Tent, Craft-Hut, TrimLine, Booth, EZup"
If you don't see one, post a Wanted ad! Lots of people hate taking the time to type up and place an ad. If they've got a tent sitting in their garage and see your ad, they'll probably contact you!
Craigslist: www.craigslist.org
Freecycle (I doubt you'd find a tent for free but maybe some parts?): www.freecycle.org
ProPanels Trading Post- this is more for panels but I've seen tents here too: http://propanels.com/forums/
Amazon- they have new products, but sometimes you can find used there too: www.amazon.com
The Wet Canvas Swap Shop: http://www.wetcanvas.com/forums/
Ebay: www.ebay.com
For a lot of artists, the end of Spring/beginning of Summer marks the start of Outdoor Art Festival season!
There are so many helpful tidbits of information and advice that I learned through experience (good and bad!) or talking to artists at shows. I want to share them with anyone who's thinking about doing outdoor shows, and those of you who've already applied gotten into some shows this summer.... and you're excited but nervous, wondering what the hell you've gotten yourself into!! (And from other artists I've talked to, that was always the initial feeling!)
For the next couple of weeks on my blog (alongside my 30 Bugs in 30 Days series!) I'll address some of the biggest questions I see over and over again in Etsy forums and WetCanvas forums (and coincidentally, the very same questions I had before my first big show).
I've also created a Squidoo page (I guess they call it a 'lens' there) that isn't as in-depth as these articles will be, but I'm sharing some links to tents, panels, supplies, and other goodies!
http://www.squidoo.com/OutdoorArtShowInfo
If you've got a specific question, please leave a comment on my blog, or ask me! :) I'll be happy to help or at least point you in (hopefully) the right direction.
Today's post starts at the very beginning (a very good place to start, as Fräulein Maria will tell you) the first thing you'll need for outdoor art shows...
Your canopy/tent.
(I use the term tent, because a tent implies that it has walls and if you're investing in a tent for more than one show, you had better plan on having walls!) The standard size is 10' x 10'. I'd strongly suggest a white tent because many shows actually require white tents. A colored tent can be dark inside and cast a colored tint onto your artwork. You can add color in other ways, but we'll get to that in another post.
My first and foremost piece of advice (no matter WHICH tent you choose, this applies) and I can't emphasize it enough so I'll make it really, really big so you don't miss it:
LOOK FOR USED!!
You will save yourself a lot of money
(and, yes, it's also ecofriendly to buy used)!
There are a zillion tents out there, which one is the best? Like most things, it depends on who you ask.
A lot of people will tell you if you're just starting out, to go with a standard pop-up-style tent (AKA "EZ-up," which is actually a brand name and has become sort of like "Kleenex," used universally for all pop-up tents) for your first tent.
Different Tent Styles....


Left: Pop-Up (EZups, etc.), Right: Dome Style (TrimLine, Craft Hut, Light Dome, etc.)
Pop-Up Style Pros:
* Not huge & easy to transport: Doesn't take up too much precious cargo space (you WILL be surprised how quickly you can fill a vehicle!).
* Light weight (relatively speaking): can be carried a short distance without too much of a hassle
* Easy to set up: You can set it up by yourself in about 10 minutes. Even little teeny tiny personnel like myself can handle it.
* Cheap: These start around $100 (shop around) if you find a great sale and don't have to pay shipping (and will be even cheaper if you find a used one).
Sounds good! Why isn't everyone using these!? Because of the
Pop-Up Style Cons:
* Not made to last forever: It might need to be replaced in a couple of years. I've talked to some artists who have used these tents for many years but it turns out they've been pretty lucky and had amazing weather at each and every show.
* Light weight: These can easily become a giant, dangerous, almost-guaranteed-to-get-someone-sued flying and flailing metal octopus if not weighted/tied down properly on a windy/stormy day. Almost every experienced artist who does outdoor shows has a story about "that one show where a storm came through and this guy's tent went flying and landed up in a tree after blowing across the entire festival and wiping out people and expensive sculptures in its path of destruction". I've used a pop-up on a windy day, but you have to REALLY weigh it down (see further down in this post).
* Limited weather proofing: Some pop-ups are coated with waterproofing, but I've been told that after one or two good rains that waterproofing is gone. There are ways to help make them more waterproof, but these aren't guaranteed- they just help. The water can also tend to pool up in the corners of the tent roof if the roof sags which may cause your tent to collapse. I've seen this at a show and it's absolutely awful, because not only will your art be ruined, but possibly the art of the artist(s) next to you.... which adds insult (and $$$ expense) to injury.
* Some might consider these too heavy. They're 50 lbs easily (some go up to 60 or 70 lbs) and are all one piece, so there is no disassembly to make them lighter. Weight is good, but if you've got to carry it for a while or you have a bad back, it's not fun.
The more experienced artists who have decided to make a long term investment in their tent tend to go with a dome-style heavy and very waterproof canvas tent. There are lots of manufacturers you'll hear over and over (click these for their price & website): Craft-Hut, LightDome & Finale, TrimLine, ShowOff. So which of these is the best? Everyone who has one will probably tell you that theirs is the best. Artists decide on which one to get based on different things- weight, price, customization, expansion opportunity, etc. Each dome-tent artist with whom I've spoken has told me they're absolutely waterproof, and if that's your main concern, you'd be safe with any of these... But do your research.
Dome Style Tent Pros:
* Waterproof. Most will come with a patching kit if you get a rip, or a simple duct tape repair will do in an emergency.
* Heavy: You'll still have to weigh it down, but it's sturdy and won't appear to be doing a spontaneous rendition of The Elaine dance on a windy day.
* Sound and sturdy design: The roof is shaped in a way that rain (or SNOW) won't collect on the top, and the legs of these are made from very, very heavy aluminum or steel (depending on the model you choose) and won't collapse under the weight if anything did start to pool up on top.
* Comes apart into many pieces: If the one-piece EZ-up is a little heavy for you to lug around, you can break this down into light pieces to carry. You'll make 5 trips carrying light loads, rather than one trip with a heavier load.
* These are so sturdy, a lot of artists see it as insurance for their work. You're almost guaranteed to have no worries of collapse or weather problems if you've got one of these.
Dome Style Tent Cons:
* NOT cheap! This is probably the main reason why every artist isn't using one of these. But, you get what you pay for. Some full-time outdoor show (a show every weekend almost all year) artists have been using these in rain, wind, and snow for over 10 years!
* Comes apart into many pieces: Takes about 30 minutes to assemble, after you've gotten the hang of it. Your first few times might take close to an hour- which is fine if you're not in a hurry. This is the other aversion artists have to these tents, as the set up seems too complicated. The first set up can be confusing, but after that you'll be fine.
* Bigger pieces & more of them + thicker tent walls = takes up more real estate in transport.
Here are some great posts with information about different tents and things to consider- these should help in your decision making process!
http://www.wetcanvas.com/forums/showthread.php?t=352267
http://www.potters.org/subject73367.htm/
Weighting Your Tent....
No matter which style of tent you choose, the most important thing you need to do to your tent: Weigh it down! (Most tents come with stakes, but I've never used them- I don't trust them.) There are many different ways to do this, and at least 50 lbs per tent leg is recommended if there is any chance of wind or storms! This is also something I can't emphasize enough- you can't have too much weight holding your tent down and better safe than sorry. If having to manage 50 lbs by yourself sounds daunting, you can use multiple weights to add up to the 50 lbs...
- Freeweights. These are what I use. My pop-up has feet on the bottom of the legs, and my freeweights (weight plates) are the kind designed for use with a bar. I insert the foot through the hole and then rest the weight on the foot and tie the tent to the weight. On a nice day, I just use 25 lbs on each leg. If the weather is questionable, I use more. You can also use dumbbells, many times I've seen tent legs tied to 25 lb dumbbells (for 50 lbs, cross the dumbbells over one another and tie the whole works together and then tie to the tent).
- 5 gallon buckets. You can fill these with sand and set them beside your tent legs and tie the tent to the bucket, or actually set the tent leg in the bucket (and tie the tent to the bucket). If you're doing a show on the beach, this is really convenient- you can grab sand right there and dump it out easily at the end of the show. When I participated at a very windy show at the beach, I put a 25 lb weight into a 5 gallon bucket, put the leg of my tent into the bucket, tied the tent leg to the weight, then piled sand into the bucket on top of the weight. It also rained, which added more weight to the bucket. It was very sturdy! You probably don't have to buy buckets- if you know anyone who has a pool, chances are they've got some of these buckets around from chlorine. If not, post an ad on your local community website, freecycle.org, craigslist.org, or ask friends and family. Keep an eye on these though, because at crowded shows I've seen them used as an ashtray- which is not only kind of gross, but actually presents a fire hazard if a cigarette isn't completely out.- Cement & PVC pipe. I have seen these at shows too, and these probably look the nicest of the different weights. I have no experience with them myself, but I see them all the time, so they must be reliable. You can make these yourself. If making single 40-50 lb weights for each leg is too heavy, make two smaller 25 lb weights for each leg.
Here is a GREAT blog with step-by-step instructions!
http://ronfrazier.blogspot.com/2006/06/pvc-and-cement-corner-weights.html
And another- Check out her booth, these weights are hardly even noticable:
http://artsycrafter.blogspot.com/2008/12/make-your-own-weights.html
Another great website with weight advice:
http://www.southendopenmarket.com/tips1.htm
If you just can't get enough of the tent weight info:
http://forums.gardenweb.com/forums/load/market/msg061846005122.html
http://www.artfairinsiders.com/forum/topics/weights-1
Weather-Proofing Pop-Ups....
If you decide to use a pop-up tent, there are definitely ways to make it last a long time and survive in storms.
Again, weight is important. These really DO fly away if not weighed down!
You'll also need:
Hula-Hoops or Swimming-Noodles. I'm not kidding! These are essential to prevent water from pooling in the corners of the tent roof. The corners of the pop-ups tend to sag, and when it rains, water will collect up there. During a show, sometimes people use a stick, broom, or their fist to poke the corners up and empty the water- but please make sure if you do this, it isn't going to splash onto customers or your artist neighbors' tents! If you have hula-hoops or swimming noodles, you can wedge them between the metal tent structure and the roof to create tension in the canopy material so the water will fall off and prevent the problem. (If you're unsure, someone at the show can probably show you how.) Look for these at a thrift store or the dollar store. You might be able to find some for free on freecycle or craigslist- post an ad and see what happens.
Our friend, The Artsy Crafter has a post about this and even a helpful photo! Check it out!
http://artsycrafter.blogspot.com/2009/05/hula-hoop-solution.html
Plastic Drop-cloths and Clamps. The pop-ups aren't the most waterproof, so this will definitely help when you've got a really rainy weekend. To completely cover the top of your tent, you'll need a drop cloth larger than 10' x 10' so that plenty of plastic hangs down over the sides of the canopy and directs the rain down and away from your art. If you need to, buy several clear plastic drop cloths and attach them together (before the show!!) with clear packing tape. As you're putting up your tent, you can throw this over the roof and as your tent goes up, your drop cloth will already be in place. You can pull the sides and center it after your tent is in position. Clamp the drop cloth down along the tent structure. I know this sounds like it will look terrible, but surprisingly it's actually not that noticable. I had to do this at the Neptune show last year, and I was afraid it was going to look dreadful and make my tent stick out like a sore thumb- but my tent easily blended in with everyone else's, and when it comes to rain possibly destroying your entire inventory, you gotta do what you gotta do!!
You can also take plastic drop cloths and hang them along the sides of your tent with the clamps. Just be sure that your roof plastic hangs OVER these and not under, or it will direct the rain flow right into your booth.

Clamps attaching the drop cloth to the tent-
There are still small areas where the rain can collect, but if you've got tension on the plastic, it should be minimal.
So while weather proofing a pop-up isn't easy or even guaranteed, it can be done. Mine has lasted me longer than most artists I talked to who had them, because I've taken a lot of precautions with it.
Waterproofing Spray:
SpareGus on Etsy recommends this as another good way to waterproof your tent: Spray the whole thing down with the waterproofing spray used on hiking boots and outdoor gear.
She says, "Basically, you would use it like you would on your gear - set it up, spray it liberally, and let it dry...make sure you've got nice weather when you do this, drying takes at least 24 hours. Most cans tell you to apply another coat after a couple days, but we have noticed that you really don't need to do that until after it's been rained on a bit...especially since doing a whole ez up, with sides, can take nearly a full can. Worth it, though, to keep everything dry. :)
Glad I could help!"
Other Resources....
Where to look for used tents:
Do a search in your area and if you live within a couple hours of other cities, do a search in those areas as well. It's worth it (to me) to drive a couple hours and save a few hundred bucks!!
Try searching for these terms & combinations of them:
"Canopy, Art Show, Display, Tent, Craft-Hut, TrimLine, Booth, EZup"
If you don't see one, post a Wanted ad! Lots of people hate taking the time to type up and place an ad. If they've got a tent sitting in their garage and see your ad, they'll probably contact you!
Craigslist: www.craigslist.org
Freecycle (I doubt you'd find a tent for free but maybe some parts?): www.freecycle.org
ProPanels Trading Post- this is more for panels but I've seen tents here too: http://propanels.com/forums/
Amazon- they have new products, but sometimes you can find used there too: www.amazon.com
The Wet Canvas Swap Shop: http://www.wetcanvas.com/forums/
Ebay: www.ebay.com
Tuesday, May 12, 2009
What a productive weekend!
I started my Saturday morning FINALLY making use of some of the packing supplies I've been hoarding since we moved (old sheets, towels, pieces of fabric, bubble wrap, paper wrap, huge plastic bags, the vinyl tablecloth from this post) and making a few Art Bags. I created them for transportation but they can (and will) be used for storage as well. Now that I'm doing 4 (or 5? I forget) art festivals this summer, I know my paintings and frames are going to take a beating in transport. And I hate that. I'm not going to buy a chinsy frame in case it might get damaged in transport, but when you spend a lot of money on a nice frame, you're constantly fretting over the fact that every time you go drive over a bump in the road, it might get hurt! Yikes!Previously, I would wrap my art in bubble wrap and then some sort of fabric, but when packing up at the end of a show, you just want to hurry up and get everything taken down and loaded up and head home. And when it's raining you're trying to do it even faster. Bubble wrap just gets thrown around, a blanket or towel wrapped sloppily around the painting and then maybe an exposed corner sticking out by the time you've got them all loaded into the car. Not good.
For my transporting bags, I cut a section of vinyl tablecloth that would fit around the whole painting with enough room for a flap to hang down over the top, to protect it from rain and water. On the inside is a pocket of sorts, with padding in the front to protect the painting or glass. I sewed up the sides by hand because I wanted to roll them up and then use a very large stitch around the seams to try and keep it closed. I was able to make 3 small bags from one tablecloth and some shoe laces are currently keeping them shut. In the future I might add velco, but I am currently investigating other more ecofriendly options.
Next to my art bag in the picture above, is one of my small tulip tree studies. I finally got those all framed up, too. (Now they just need to have their bags made!)
I also finished up the green grapes in my 2nd grapes painting and on Sunday I gave the purple ones a 2nd coat. They'll need a few more, and I didn't finish that painting last week like I wanted, but I did get those other things out of the way that aren't a big deal but were definitely time consuming and on my "to do" list.
Since I probably won't continue to offer small prints (5"x7") as standard sizes at art shows (but will create them upon custom request), I printed, matted, and framed some small prints, too. I've got a lot of 5" x 7" frames around that are just sitting there empty, begging to be filled with some art. I framed one small one in a bright blue picture frame and was happy with the result, so I might paint some of the other frames I've got laying around here in bright colors and put a print in them. It will be great to bring them to shows this summer and see people's reactions to them- buying something already framed is obviously one less step for anyone to have to do, so people might like that! (I would!)

Since I'm almost done with my grapes painting, it's time to figure out what's next. And.... I currently have no idea. Or too many ideas? Tropical flowers are my favorite things to paint, but I like to highlight local things too. I've got a canvas that is 24" x 36" and this picture of passion flowers is just the right proportions for it. I'm not sure if this will be what I paint next, as I'm getting a little tired of looking at green and purple.
And lastly, I finally listed a print of the first grapes into my Etsy store.... Took long enough!
Let's hope that my next blog post is a picture of the finished 2nd grapes painting!!
Posted by
Samantha G
at
1:31 PM
3
comments
Labels:
Art Bags,
Art show,
flowers,
grapes,
green,
Paintings,
passion flowers,
tulip
Friday, May 1, 2009
Oh nooo.... WHERE IS MY WINGS CD!?
I can't stop singing Nineteen Hundred and Eighty Five!
Ohh, I just found it! In the classic rock CD book.
And in other good news, I've been invited to return to Artsfest in Solomon's, MD again this year! :)
Just found out today! What a great week!!!
Ohh, I just found it! In the classic rock CD book.
And in other good news, I've been invited to return to Artsfest in Solomon's, MD again this year! :)
Just found out today! What a great week!!!
Thursday, April 30, 2009
It's been a good news week!
Three things happened this week that made me quite a happy girl!
#1. Tony Moffitt's Art World selected me as one of his Top 10 blogs in his new occasional Top 10 best blogs post series!
http://tonymoffitt.blogspot.com/
I am so unbelievably flattered! His website offers amazing, practical advice to artists daily, so you can see why this is a huge compliment. Another plus is that his posts are short, simple, and straightforward. So if you're looking for advice, you won't have to sit for an hour sifting through everything and end up forgetting half of it later.

#2 My frog photo on Flickr (above) was chosen to be included on the Schmap Baltimore guide for the National Aquarium! Schmap is a website full of resources that can assist in your trip planning with maps, guides, and user reviews.
#3. I found out that I was invited to exhibit at the Mount Gretna Outdoor Art Show on August 15 & 16. Another show to add to the summer agenda... Yay!
So the latest thing I'm working on is -- eh, well, I probably shouldn't say. I don't want to post too much about it because I'm incredibly afraid of jinxing myself. I may not believe in much, but I believe in jinxes and karma, big time, so just let me have this and if I get some good news in the next couple of weeks, I'll definitely be posting a follow up! Eeeee, it's a project I'm really excited about!! But it's the reason I've been scarce this week.
If you're following me on Twitter you probably know about and have seen what I'm working on... but SHHHH, don't tell! And send me some positive thoughts... pleeease.
#1. Tony Moffitt's Art World selected me as one of his Top 10 blogs in his new occasional Top 10 best blogs post series!
http://tonymoffitt.blogspot.com/
I am so unbelievably flattered! His website offers amazing, practical advice to artists daily, so you can see why this is a huge compliment. Another plus is that his posts are short, simple, and straightforward. So if you're looking for advice, you won't have to sit for an hour sifting through everything and end up forgetting half of it later.
#2 My frog photo on Flickr (above) was chosen to be included on the Schmap Baltimore guide for the National Aquarium! Schmap is a website full of resources that can assist in your trip planning with maps, guides, and user reviews.
#3. I found out that I was invited to exhibit at the Mount Gretna Outdoor Art Show on August 15 & 16. Another show to add to the summer agenda... Yay!
So the latest thing I'm working on is -- eh, well, I probably shouldn't say. I don't want to post too much about it because I'm incredibly afraid of jinxing myself. I may not believe in much, but I believe in jinxes and karma, big time, so just let me have this and if I get some good news in the next couple of weeks, I'll definitely be posting a follow up! Eeeee, it's a project I'm really excited about!! But it's the reason I've been scarce this week.
If you're following me on Twitter you probably know about and have seen what I'm working on... but SHHHH, don't tell! And send me some positive thoughts... pleeease.
Posted by
Samantha G
at
10:15 PM
1 comments
Labels:
Art,
Art show,
blog,
eco,
ecofriendly,
local stuff
Subscribe to:
Posts (Atom)